What Temp To Cook Cut Potatoes In Oven For Crispy Results
Learning the right temp to cook cut potatoes in oven transforms ordinary potatoes into crispy, golden bites. The ideal temperature is 425°F, which creates a perfect balance of crispy edges and fluffy centers. Proper prep like soaking, drying, and single-layer baking ensures every batch comes out perfectly roasted. With the right oven-baked potatoes technique, you can achieve restaurant-quality results in under an hour.
There’s something magical about temp to cook cut potatoes in oven at just the right setting. You can turn a simple potato into a crunchy, golden side dish that everyone loves. Whether you’re making potato wedges, diced potatoes, or crispy roasted chunks, the oven temperature makes all the difference.
Many people wonder what temperature to bake cut potatoes for the best texture. The answer isn’t just about setting a dial. It’s about understanding how heat interacts with starch and moisture. When you know the science, you can consistently produce crispy roasted potatoes with fluffy centers.
This guide will walk you through the exact temperatures, prep steps, and timing you need. You’ll learn why 425°F works so well, how to cut potatoes evenly, and what mistakes to avoid. By the end, you’ll feel confident making perfect oven-baked potatoes every single time.
Key Takeaways
- 425°F is the sweet spot: This temperature delivers crispy exteriors and fluffy interiors without burning.
- Soak potatoes to remove starch: Parboiling or soaking in cold water helps achieve maximum crispiness.
- Single layer is essential: Overcrowding the pan traps steam and leads to soggy potatoes.
- Pat dry before tossing in oil: Excess moisture prevents browning and crisping.
- Flip halfway through baking: This ensures even golden color on all sides.
- Season after oiling: Salt and spices stick better to oily surfaces for flavorful roasted potato wedges.
- Use parchment paper or a wire rack: Both promote airflow and prevent sticking for perfectly oven-baked potatoes.
📑 Table of Contents
- The Ideal Oven Temperature for Crispy Cut Potatoes
- How to Prep Potatoes for Even Browning
- Step-by-Step: From Cutting to Oven
- Common Mistakes That Make Potatoes Soggy
- Choosing the Right Baking Sheet and Tools
- The Science Behind Crispy Roasted Potatoes
- How to Tell When Cut Potatoes Are Done
- Timing and Seasoning Tips
- Conclusion
The Ideal Oven Temperature for Crispy Cut Potatoes
Why 425°F Is the Gold Standard
The most recommended temp to cook cut potatoes in oven is 425°F (220°C). At this temperature, the outside caramelizes quickly while the inside cooks through gently. This balance creates that perfect contrast of crispy skin and soft, fluffy flesh.
Why does 425°F work so well? High heat rapidly evaporates surface moisture. This allows the potatoes to dehydrate and form a crunchy crust. Meanwhile, the interior steams and becomes tender. If you set the oven too low, the potatoes will roast slowly and release too much moisture. They’ll turn soft and pale instead of golden.
On the other hand, temperatures above 450°F can burn the outside before the inside is done. The edges become bitter while the center remains hard. Sticking with 425°F gives you a reliable window for crispy roasted potatoes every time.
For most home cooks, 425°F is the sweet spot between speed and texture. It takes about 25 to 30 minutes to achieve golden brown edges without drying out the interior. This temperature also works well for different potato cuts, from wedges to cubes. The consistent heat ensures that every piece browns evenly, giving you that restaurant-quality finish.
What If You Want Lower or Higher Heat?
Sometimes you might need to adjust the temperature. A lower setting of 400°F works well for larger potato chunks. The slower cook allows heat to penetrate thick pieces without burning the edges. You’ll just need to add a few extra minutes to the baking time. This method is great for dense, floury potatoes that need a gentle roast.
For smaller diced potatoes or thin wedges, you can bump the heat up to 450°F. The higher temperature speeds up browning and creates extra crunch. Just watch them closely to prevent burning. A quick toss halfway through ensures even golden brown color. Smaller pieces also benefit from higher heat because they have more surface area relative to their volume.
If you’re using a convection oven, reduce the temperature by 25°F. The fan circulates hot air more efficiently, so 400°F in a convection oven works just like 425°F in a conventional oven. This small adjustment prevents overcooking while still delivering crispy edges. Convection ovens are excellent for roasted potato wedges because the moving air removes moisture faster. Just remember to reduce the time slightly as well.
How to Prep Potatoes for Even Browning
Pick the Right Potato Type
Not all potatoes behave the same way in the oven. Russet potatoes are the classic choice for crispy roasted potatoes. Their high starch content helps them dry out and crisp beautifully. Yukon Gold potatoes are another great option. They have a buttery texture and hold their shape well during roasting.
Avoid waxy potatoes like red potatoes for crispy results. They contain more moisture and less starch, which makes them harder to crisp. They tend to stay soft and can turn mushy in the oven. If you want the best oven-baked potatoes, stick with russet or Yukon Gold varieties. These types have the right balance of starch and moisture for perfect roasting.
New potatoes or fingerlings can work too, but they’re better for boiling or salads. For crispy roasted potatoes, choose older, drier potatoes. They have less water content and more starch, which is exactly what you need for crunch. A good rule of thumb is to select firm potatoes with no green spots or sprouts.
Cutting Sizes That Cook Uniformly
Consistency matters when you cut potatoes for roasting. Aim for pieces about 1 to 1.5 inches in size. This size allows heat to reach the center without burning the outside. Smaller pieces will crisp faster, while larger chunks need more time.
Use a sharp knife and cut with the grain of the potato. This helps the pieces hold together during baking. If you’re making potato wedges, cut the potato in half lengthwise, then slice each half into thirds or quarters. For diced potatoes, chop into even cubes so they cook at the same rate.
Uneven cuts lead to some pieces burning while others stay raw. Take your time with this step. Uniform diced potatoes or wedges guarantee a perfect batch of crispy roasted potatoes. A good rule of thumb is to make all pieces roughly the same size. This way, they’ll all finish cooking at the same time. A simple kitchen timer can help you stay on track.
Soak to Remove Starch for Crispiness
This is the secret step many people skip. Soaking cut potatoes in cold water for 30 minutes to 2 hours removes excess surface starch. Starch is what makes potatoes gummy and prevents crispiness. By rinsing it away, you allow the potatoes to dry out and brown properly.
Fill a large bowl with cold water and add the cut potatoes. Let them soak while you preheat the oven. After soaking, drain the potatoes and spread them on a clean kitchen towel. Pat them completely dry. Any remaining moisture will steam in the oven and create soggy results.
For even better results, you can parboil the potatoes for 3 to 5 minutes. This partially cooks the inside and roughs up the surface. The rough edges catch oil and seasonings, leading to extra crunch. Just be sure to dry them thoroughly after parboiling. This technique is a game-changer for oven-baked potatoes. It also reduces the overall baking time because the inside is already partially cooked.
Step-by-Step: From Cutting to Oven
Toss with Oil and Seasoning
Once your potatoes are dry, it’s time to coat them. Place the cut potatoes in a large mixing bowl. Drizzle with olive oil or avocado oil. Use about 1 tablespoon of oil per pound of potatoes. Too much oil makes them greasy; too little leaves them dry.
Toss the potatoes gently until every piece is lightly coated. Then add your seasoning. A simple blend of salt, black pepper, garlic powder, and paprika works wonders. You can also add fresh herbs like rosemary or thyme for extra flavor. A pinch of onion powder adds depth without overpowering the natural potato taste.
The oil helps transfer heat evenly to the potato surface. It also conducts heat away from the oven walls, promoting browning. Without enough oil, the potatoes will stick to the pan and burn. With the right amount, you’ll achieve perfectly crispy roasted potatoes that are golden and delicious. The oil also helps the seasonings adhere to the surface, so every bite is flavorful. For extra crispiness, you can add a light dusting of cornstarch or flour before tossing.
Spread in a Single Layer
Arrange the seasoned potatoes on a lined baking sheet. Use parchment paper or a silicone baking mat for easy cleanup. The key is to spread them in a single layer with space between each piece.
When potatoes touch or overlap, they steam instead of roast. This creates soft, pale spots instead of crispy edges. Use two baking sheets if necessary. It might feel like a hassle, but it makes a huge difference. The temp to cook cut potatoes in oven works best when air can circulate freely around each piece.
Place the potatoes on the upper third of the oven. This positioning allows hot air to hit the tops and bottoms evenly. If you only have one sheet, bake in batches. Waiting for the pan to heat up before adding potatoes also improves crispiness. A hot pan starts the cooking process immediately, which helps form that first layer of crunch. Avoid using dark-colored pans if possible, as they absorb more heat and can cause uneven browning.
Bake, Flip, and Finish
Bake the potatoes at 425°F for 20 to 30 minutes, depending on the size. At the 15-minute mark, open the oven and give the pan a shake. This prevents sticking and promotes even browning. For the best results, flip each piece using a spatula at the halfway point.
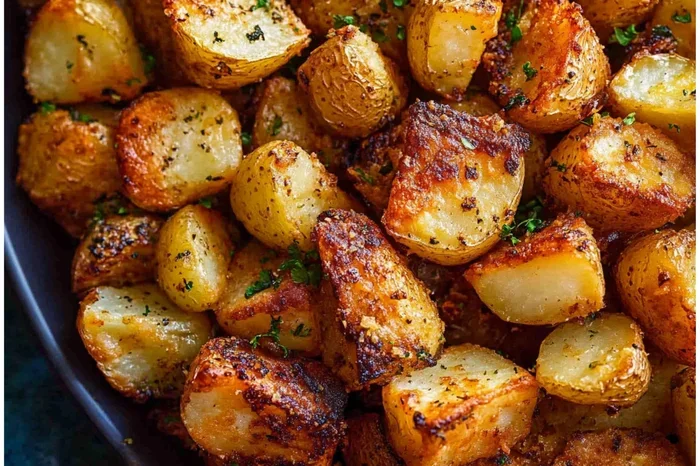
Look for golden brown edges and a firm texture. The potatoes should be crispy on the outside and fluffy on the inside. If you prefer extra crunch, you can broil them for 1 to 2 minutes at the end. Watch them closely to avoid burning. The broiler adds a final burst of heat that crisps up the surface beautifully.
Once done, remove the pan and let the potatoes rest for 5 minutes. This allows the steam to escape and the crust to set. Serve immediately while they’re still hot and crispy. These oven-baked potatoes pair perfectly with almost any main dish. They’re especially good with roasted meats, grilled vegetables, or a fresh salad. A squeeze of lemon juice or a sprinkle of fresh parsley adds a bright finish.
Common Mistakes That Make Potatoes Soggy
Overcrowding the Baking Sheet
The number one mistake is packing too many potatoes onto one pan. It’s tempting to fit everything on a single sheet to save time. But overcrowding traps steam and prevents proper air circulation. The result is soft, steamed potatoes instead of crispy roasted potato wedges.
Give each piece at least half an inch of space. If your baking sheet is small, use two pans or bake in multiple batches. The extra effort pays off with perfectly crispy edges and even cooking. Remember, temp to cook cut potatoes in oven works best when each piece has room to breathe. Overcrowding also lowers the temperature of the pan when you load it, which slows down the initial browning. Think of it like searing meat—you need space for the Maillard reaction to occur.
Skipping the Soak or Drying Step
As mentioned earlier, moisture is the enemy of crispiness. If you skip the soak or don’t dry the potatoes thoroughly, they’ll release steam in the oven instead of browning. The surface stays wet, and you end up with pale, soft potatoes.
Always take the time to soak and dry your potatoes. This step might seem minor, but it separates good roasted potatoes from great ones. After soaking, spread the potatoes on a towel and pat them dry. You can even let them air-dry for a few minutes. Removing surface moisture ensures that the oil can do its job of frying the potatoes lightly in the oven. This small step makes a huge difference in texture. Dry potatoes will also season better because the salt and spices stick to a slightly tacky surface.
Using the Wrong Oil Temperature
Some people toss potatoes in oil that’s already hot in the pan, but this method doesn’t work well for oven roasting. The oil needs to coat the potatoes before they hit the oven. Cold oil on cold potatoes, then into a hot oven, allows the oil to heat gradually and fry the potato surface gently.
If you add potatoes to a hot, oiled pan straight from the stove, the oil may smoke before the potatoes are ready. The outside can burn while the inside remains undercooked. Keep it simple: toss cold potatoes with room-temperature oil and seasoning, then spread them on a room-temperature baking sheet. This method gives you the best crispy roasted potatoes. It also prevents the oil from breaking down and creating off-flavors. Room-temperature oil also helps the seasonings distribute more evenly.
Choosing the Right Baking Sheet and Tools
Parchment Paper vs. Aluminum Foil
The material you use on your baking sheet affects crispiness. Parchment paper is the best choice for oven-baked potatoes. It provides a non-stick surface and allows air to circulate underneath. The potatoes won’t stick, and the bottom stays crispy.
Aluminum foil is a common alternative, but it can trap steam. The foil reflects heat back onto the potato, which can make the bottom soft. If you must use foil, crumple it slightly to create air pockets. This allows some airflow and prevents steaming. However, for the crispiest roasted potato wedges, parchment paper or a bare baking sheet is ideal. A bare, unlined sheet can also work if you grease it lightly with oil. The key is to avoid trapping moisture directly against the potato surface.
Wire Racks for Extra Crispiness
A wire cooling rack placed over a baking sheet is a pro trick for extra crunch. The rack allows hot air to circulate all around the potato pieces. No part sits flat against a hot surface, so there’s no risk of steaming or soggy bottoms.
Simply place a wire rack on top of a rimmed baking sheet. Arrange the potatoes on the rack and bake as usual. The result is uniformly crispy on all sides. This method is especially effective for diced potatoes and thin wedges. It’s a small change that elevates your crispy roasted potatoes to the next level. You can also use a cooling rack directly on the oven rack for even better airflow. This technique mimics the environment of a commercial convection oven.
The Science Behind Crispy Roasted Potatoes
How Starch and Moisture Affect Texture
Understanding the science helps you troubleshoot problems. Potatoes are full of starch and water. When you cut them, starch granules are released to the surface. If you don’t remove that starch, it gelatinizes in the oven and creates a gummy, sticky coating. This is why soaking is so important.
Moisture is the other factor. Water on the surface turns to steam, which prevents browning. The goal is to evaporate surface moisture quickly so the Maillard reaction can occur. This is the chemical reaction that creates browning and complex flavors. The temp to cook cut potatoes in oven at 425°F is hot enough to drive off moisture fast and kickstart this reaction.
When you combine dry potato surfaces with high heat, the starches caramelize and the proteins brown. This creates the crispy, flavorful crust we all love. The inside stays moist because the heat penetrates slowly. That’s the magic of crispy roasted potatoes. The starch granules swell and soften as they absorb moisture from the interior, creating that fluffy, creamy texture we crave in perfectly roasted potatoes.
The Maillard Reaction and Browning
The Maillard reaction is what gives roasted potatoes their deep, golden color and complex flavor. It occurs when amino acids and sugars in the potato react under high heat. This reaction only happens above 285°F, which is why oven temperatures of 425°F are so effective.
To maximize the Maillard reaction, make sure the potato surface is dry and coated with oil. Oil conducts heat more efficiently than air, speeding up browning. A light coating of oil also raises the surface temperature above the boiling point of water, which accelerates the reaction. This is why tossing potatoes in oil before baking is essential for crispy edges and rich flavor. A thin, even layer is all you need—too much oil will just cause splattering and greasy results.
How to Tell When Cut Potatoes Are Done
Visual and Texture Cues
Knowing when your oven-baked potatoes are ready comes down to a few simple cues. Look for a deep golden brown color all over the pieces. The edges should look slightly darker and have a crisp, lacy appearance. The potatoes should also feel firm when you shake the pan gently.
If the potatoes look pale and soft, they need more time. If they look dark and dried out, they may be overcooked. The perfect crispy roasted potatoes have a vibrant golden hue and a slight sheen from the oil. Trust your eyes and nose—the aroma of roasting potatoes is a reliable indicator that they’re almost done.
The Fork Test
The fork test is the most reliable way to check doneness. Pierce the thickest piece with a fork or skewer. It should slide in smoothly with little resistance. If you feel hardness in the center, the potatoes need a few more minutes. If they slide in too easily, they may be overcooked and falling apart.
For the best roasted potato wedges, aim for a tender center with a distinct crispy crust. The inside should be fluffy and mealy, not watery or hard. Once they pass the fork test, remove them from the oven immediately. The residual heat will continue to crisp the exterior slightly as they rest on the pan for a few minutes.
Timing and Seasoning Tips
When to Add Salt for Best Flavor
Timing your salt addition affects both flavor and texture. Many chefs recommend salting potatoes after they’ve been tossed in oil. The oil helps the salt adhere to the surface and dissolve slightly during baking. This creates a more even seasoning distribution and prevents the salt from drawing out moisture too early.
If you salt before oiling, the salt can pull water to the surface, creating steam and hindering crispiness. However, a light pre-salting can work if you’re in a hurry. For the best results, salt after the oil coating and again right before serving. This double-salt method ensures every bite is perfectly seasoned. Freshly cracked black pepper added at the end also provides a bright, aromatic kick.
Fresh vs. Dried Herbs
Fresh herbs like rosemary and thyme release their oils slowly in the oven, infusing the potatoes with a gentle, aromatic flavor. Dried herbs are more concentrated and can burn at high temperatures, so add them earlier in the cooking process. A good rule is to add dried herbs with the oil and fresh herbs during the last 10 minutes of baking.
For oven-baked potatoes, garlic can be used fresh or as a powder. Fresh minced garlic can burn quickly, so it’s best added halfway through. Garlic powder distributes more evenly and provides a consistent savory flavor throughout. Experiment with different combinations like smoked paprika and rosemary or chili flakes and oregano to create your signature crispy roasted potatoes.
Conclusion
Mastering the temp to cook cut potatoes in oven is easier than you think. The magic number is 425°F, paired with proper prep and a single layer on the baking sheet. From soaking away starch to flipping halfway, each step contributes to that perfect crunch.
Remember, the best crispy roasted potatoes come from using the right potato type, cutting evenly, and not overcrowding the pan. Whether you prefer classic herb flavors or spicy seasonings, these techniques work every time. You now have all the tools to make oven-baked potatoes that rival any restaurant dish.
Next time you’re planning a meal, give these methods a try. Your family and guests will love the golden, crunchy results. The temp to cook cut potatoes in oven is simple, but the impact on your cooking is huge. Enjoy your perfectly crispy potatoes!
Frequently Asked Questions
Can I use a different oven temperature for cut potatoes?
Yes, you can adjust the temperature based on the size of your potato pieces. For larger chunks, 400°F works well with a longer bake time. For smaller wedges or diced potatoes, 450°F creates extra crunch. Just keep an eye on them to prevent burning.
Do I need to peel potatoes before roasting them?
No, peeling is optional. The skin adds texture and nutrients to your oven-baked potatoes. Just make sure to scrub them well. If you prefer a smoother texture, you can peel them, but leaving the skin on gives a rustic, crispy finish.
How long does it take to roast cut potatoes at 425°F?
At 425°F, cut potatoes typically take 20 to 30 minutes. Smaller pieces like diced potatoes may be done in 20 minutes, while larger wedges might need the full 30 minutes. Flip them halfway through for even browning and crispy edges.
Can I parboil potatoes before roasting them in the oven?
Absolutely. Parboiling for 3 to 5 minutes softens the inside and roughs up the surface. This helps the potatoes absorb oil and seasonings better, leading to extra crispy roasted potato wedges. Just be sure to dry them thoroughly before tossing with oil.
What is the best oil for roasting potatoes?
Olive oil and avocado oil are the best choices. They have high smoke points and add a subtle flavor. Avoid butter or coconut oil, which can burn at 425°F. A light, even coating of oil helps achieve perfectly crispy roasted potatoes.
How do I keep roasted potatoes crispy after they come out of the oven?
Spread the potatoes on a wire rack instead of a solid pan. This allows steam to escape and prevents soggy bottoms. Avoid covering them with foil, which traps moisture. Serve immediately for the best crunch, or keep them warm in a low oven (200°F) on the rack.