How To Dry Out Apples In The Oven With Simple Steps
Learning how to dry out apples in the oven is one of the easiest and most rewarding kitchen skills you can pick up. Whether you want crunchy homemade apple chips, chewy dried fruit snacks, or ingredients for apple leather, your oven can do the job perfectly. This guide walks you through every step with clear instructions, helpful tips, and common mistakes to avoid.
There is something truly satisfying about turning a simple apple into a delicious dried snack right in your own kitchen. How to dry out apples in the oven is a question many home cooks ask, and the answer is simpler than you might think. With just a few basic supplies and a little patience, you can create homemade apple chips that taste far better than anything store-bought.
Drying fruit in the oven is one of the oldest food preservation methods still used today. It works by removing moisture from the fruit, which prevents bacteria and mold from growing. This means your oven dried apples can last for weeks without refrigeration. The process also concentrates the natural sweetness, making every bite intensely flavorful.
In this guide, we will cover everything you need to know. From choosing the right apples to storing your finished snacks, you will find all the details here. Let us dive into the world of drying fruit in oven and make some delicious dried fruit snacks together.
Key Takeaways
- Low heat is key: Keeping your oven between 200°F and 250°F ensures even drying without burning.
- Prep matters: Slicing apples evenly and removing the core helps them dry at the same rate.
- Line your baking sheet: Using parchment paper prevents sticking and makes cleanup a breeze.
- Flip halfway through: Turning apple slices mid-dry promotes consistent crispness on both sides.
- Storage tips extend shelf life: Properly stored oven dried apples can last for weeks in an airtight container.
- Oven drying is a great food dehydrator alternative: You do not need expensive equipment to make delicious dried fruit.
- Experiment with flavors: Cinnamon, honey, and lemon juice add exciting twists to your crispy apple treats.
📑 Table of Contents
- Why Dry Apples In The Oven?
- Choosing The Right Apples For Drying
- Tools And Ingredients You Will Need
- Step By Step Guide To Drying Apples In The Oven
- Storing Your Dried Apples Properly
- Creative Ways To Use Dried Apples
- Common Mistakes To Avoid When Drying Apples
- Expert Tips For Perfect Oven Dried Apples
- Frequently Asked Questions
Why Dry Apples In The Oven?
You might wonder why you should bother drying apples in the oven when food dehydrators exist. The truth is, your oven works just as well for small batches. It is convenient, requires no extra equipment, and most people already have one in their kitchen.
Here are some great reasons to try oven dried apples:
- No special equipment needed: You already own everything required. Just an oven, a baking sheet, and parchment paper.
- Cost effective: Buying dried apples at the store can be expensive. Drying your own saves money over time.
- Full control over ingredients: You decide how much sugar or spice goes into your crispy apple treats.
- Great for beginners: The process is straightforward and hard to mess up if you follow the steps.
- Perfect for meal prep: Make a big batch and enjoy healthy snacks all week long.
- Fun family activity: Kids love helping slice apples and watching them transform in the oven.
When you compare oven drying to other methods like sun drying or using a food dehydrator, the oven offers more consistency. You control the temperature precisely, which leads to more even results. Sun drying depends on weather conditions, and a dehydrator requires a separate purchase. Your oven gives you the best of both worlds.
Choosing The Right Apples For Drying
Not all apples are created equal when it comes to dehydrating apples. Some varieties hold their shape better, while others become too soft or too tart. Choosing the right apple makes a big difference in your final result.
Best Apple Varieties For Oven Drying
Certain apple types work exceptionally well for making homemade apple chips. Here are the top picks:
- Fuji apples: Naturally sweet and firm, Fuji apples dry into crispy, delicious slices. They are a favorite among oven dried apple enthusiasts.
- Gala apples: Mild and sweet with a thin skin, Galas dry evenly and taste wonderful.
- Honeycrisp apples: Juicy and crisp, they hold up well during the drying process.
- Granny Smith apples: Tart and firm, they make a great option if you prefer a tangy flavor.
- Pink Lady apples: Sweet with a hint of tartness, they produce beautifully dried slices.
Apples To Avoid
Some apple varieties do not dry as well. Avoid Red Delicious, which can become mushy and lose their shape. Very soft or bruised apples also do not hold up during the drying process. Always choose fresh, firm apples for the best drying fruit in oven results.
Freshness Matters
The sugar content in apples affects how they dry. Fresher apples with lower moisture content tend to dry faster and more evenly. Try to use apples that were picked recently. If you buy apples from a farmers market, they are often fresher than those from a grocery store. This small choice can improve your fruit dehydration results noticeably.
Tools And Ingredients You Will Need
Before you start, gather everything you need. Having all your supplies ready makes the process smooth and enjoyable. You do not need a long shopping list for this project.
Essential Tools
- A sharp knife or apple corer for slicing
- A cutting board
- A large mixing bowl
- Parchment paper or silicone baking mats
- A baking sheet or sheet pan
- A spatula for flipping slices
- Airtight containers or zip-lock bags for storage
Optional Ingredients For Flavor
Plain dried apples taste great on their own. But adding a few simple ingredients can take your crispy apple treats to the next level:
- Cinnamon: A light sprinkle adds warmth and classic flavor.
- Lemon juice: A few drops prevent browning and add a bright tang.
- Honey: A thin drizzle creates a subtle sweetness on the surface.
- Nutmeg: Just a pinch pairs beautifully with apples.
- Vanilla extract: A drop or two adds a lovely aroma.
Step By Step Guide To Drying Apples In The Oven
Now for the main event. This section covers the complete process for how to dry out apples in the oven. Follow these steps carefully, and you will have perfect results every time.
Step 1: Wash And Prep Your Apples
Start by rinsing your apples under cool water. Use a vegetable brush to remove any wax or residue from the skin. Dry them with a clean towel. This step ensures your oven dried apples are clean and free from any unwanted chemicals.
Step 2: Slice The Apples Evenly
Use a sharp knife to cut your apples into thin, even slices. Aim for about 1/8 inch thick. Uniform slices dry at the same rate, which prevents some pieces from burning while others stay moist. An apple corer works well too, especially if you want to make apple rings for a pretty presentation.
Remove the core and any seeds from each slice. You can peel the apples if you prefer, but leaving the skin on adds fiber and a nice texture. Many people enjoy the skin-on version for its rustic look and added nutrients.
Step 3: Optional Soaking For Flavor And Color
This step is optional but recommended. Soak your apple slices in a bowl of water mixed with lemon juice for about 10 minutes. The lemon juice prevents oxidation, which keeps your slices from turning brown. It also adds a subtle citrus flavor that complements the natural sweetness of the apples.
After soaking, drain the slices and pat them dry with a clean towel. Remove excess moisture before placing them on the baking sheet. This helps the fruit dehydration process work more efficiently.
Step 4: Arrange Slices On The Baking Sheet
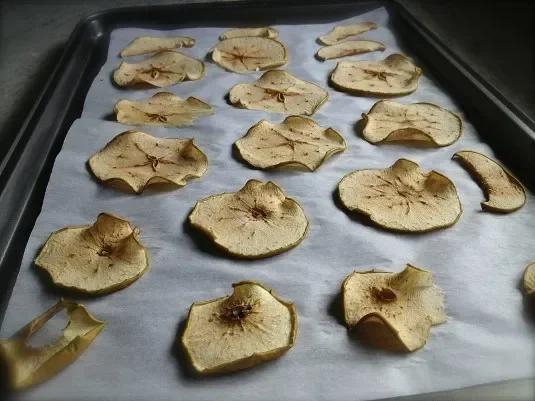
Line your baking sheet with parchment paper. This simple trick prevents sticking and makes cleanup effortless. Arrange the apple slices in a single layer with no overlapping. Leave a small gap between each slice so air can circulate freely.
Proper spacing is crucial for even low temperature baking. If slices touch each other, they will steam instead of dry, leading to chewy rather than crispy results. Use two baking sheets if you need more space.
Step 5: Set The Oven Temperature
Set your oven to the lowest temperature possible, ideally between 200°F and 250°F. Low temperature baking is the secret to perfect oven dried apples. High temperatures will burn the outside while leaving the inside moist.
If your oven does not go below 200°F, crack the door open slightly to let moisture escape. A wooden spoon handle works well for propping the door open. This small adjustment improves airflow and helps the drying process significantly.
Step 6: Bake And Monitor
Place the baking sheet on the middle rack of your oven. Set a timer for one hour. After the first hour, open the oven and check the slices. Use a spatula to flip each piece over. This ensures both sides dry evenly.
Continue baking for another 1 to 2 hours. The total time depends on your oven, the thickness of your slices, and the apple variety. Check every 30 minutes after the first two hours. You want the slices to be dry and slightly crispy but not burnt.
Step 7: Cool And Test For Doneness
Remove the baking sheet from the oven and let the slices cool completely on a wire rack. Drying fruit in oven is not finished once you pull them out. The cooling process firms up the texture and makes them even crispier.
Test a slice by breaking it in half. It should snap cleanly without any moisture in the center. If it feels leathery or soft, return it to the oven for another 30 minutes. Do not rush this step. Properly dried homemade apple chips should be crispy and satisfying.
Storing Your Dried Apples Properly
Once your oven dried apples are completely cool, proper storage becomes essential. The right storage method keeps your dried fruit snacks fresh and delicious for weeks.
Best Storage Containers
- Airtight glass jars: These keep moisture out and look beautiful on your kitchen counter.
- Zip-lock bags: Squeeze out excess air before sealing for a simple and effective option.
- Vacuum-sealed bags: These provide the longest shelf life by removing all air.
- Plastic containers with lids: A good everyday option that works well for small batches.
How Long Do Dried Apples Last?
When stored correctly, oven dried apples last for 2 to 4 weeks at room temperature. In the refrigerator, they can last up to 3 months. For the longest storage, freeze them in airtight bags for up to 6 months. Always check your dried fruit for any signs of moisture or mold before eating.
Pro Tips For Longer Shelf Life
Adding a small packet of silica gel to your storage container absorbs any remaining moisture. Keep your containers in a cool, dark place away from direct sunlight. Avoid storing dried fruit snacks near the stove or oven where heat and humidity can degrade their quality.
Creative Ways To Use Dried Apples
Once you master the art of dehydrating apples, you will find countless ways to enjoy them. Oven dried apples are incredibly versatile and can be used in many recipes and snacks.
Snack Ideas
- Eat them straight from the jar as a healthy, natural dried fruit snacks
- Mix them into homemade trail mix with nuts and seeds
- Add them to yogurt or oatmeal for a crunchy topping
- Pair them with cheese for a sweet and savory combination
Baking And Cooking Uses
- Chop dried apples and add them to muffins or quick breads
- Use them as a topping for pancakes or waffles
- Blend them into apple leather for a fun fruit snack
- Add them to salads for a sweet and chewy contrast
- Include them in homemade granola or energy bars
Gift Giving Ideas
Homemade apple chips make wonderful gifts. Package them in mason jars with a ribbon and a handwritten label. Friends and family will appreciate the effort and thought. These crispy apple treats are also great for holiday gift baskets and classroom treats.
Common Mistakes To Avoid When Drying Apples
Even though drying fruit in oven is simple, a few common mistakes can ruin your results. Learning what to avoid saves time and frustration.
Slicing Apples Unevenly
This is the most common mistake. Uneven slices mean some pieces burn while others stay moist. Take your time when cutting. Use a mandoline slicer for perfectly uniform thickness if you have one available.
Overcrowding The Baking Sheet
Placing too many slices on one sheet blocks airflow and causes steaming. Give each piece enough space. Remember, low temperature baking relies on good air circulation to remove moisture effectively.
Setting The Temperature Too High
It can be tempting to increase the heat to speed things up. Resist this urge. High temperatures burn the outside of the apple while trapping moisture inside. Stick to the recommended range of 200°F to 250°F for the best fruit dehydration results.
Skipping The Cooling Step
Some people think dried apples are done the moment they come out of the oven. But the cooling step is essential. The texture changes as the slices cool, becoming crisper and more satisfying. Always let them cool completely before storing.
Not Checking Regularly
Every oven behaves differently. Do not set it and forget it. Check your oven dried apples frequently, especially during the last hour of baking. Ovens with hot spots can cause uneven drying, so rotating the pan halfway through helps a lot.
Expert Tips For Perfect Oven Dried Apples
Professional bakers and food experts share insights that can elevate your homemade apple chips from good to amazing. Here are some tips worth knowing.
Use A Meat Thermometer
Place a meat thermometer inside your oven to verify the actual temperature. Many ovens run hotter or cooler than their settings suggest. Knowing the real temperature helps you adjust and achieve consistent drying fruit in oven results every time.
Try Different Spice Blends
Experiment with flavors to keep your dried fruit snacks exciting. A mix of cinnamon and cayenne creates a spicy-sweet kick. Cocoa powder and sea salt add a chocolatey twist. Cardamom and ginger offer an exotic flavor profile that pairs beautifully with apples.
Save Your Apple Cores
Do not throw away the cores and peels. Place them on a separate baking sheet and dry them alongside your slices. These scraps make a wonderful addition to teas, smoothies, and homemade apple leather. It is a great way to reduce food waste while getting more value from your fruit.
Batch Size Matters
For the best results, dry apples in small batches. Overloading the oven reduces airflow and increases drying time. Two to three baking sheets at a time is the sweet spot for most home ovens. This approach gives you the most control over your fruit dehydration process.
Adjust For Humidity
Humid days slow down the drying process significantly. If you live in a humid climate, extend your baking time by 30 to 60 minutes. You can also run your oven with the door cracked open for extra moisture removal. Patience is your best friend when drying apples low and slow in humid conditions.
Frequently Asked Questions
Can I dry apples in the oven without parchment paper?
Yes, you can, but parchment paper makes the process much easier. It prevents sticking and simplifies cleanup. If you do not have parchment paper, a silicone baking mat works as an excellent alternative. Avoid using bare metal baking sheets, as the apple slices will likely stick and tear when you try to remove them.
How long does it take to dry apples in the oven?
Typically, it takes between 2 and 4 hours to fully dry apples in the oven. The exact time depends on the thickness of your slices, the oven temperature, and the apple variety. Thinner slices dry faster, while thicker pieces need more time. Always check for doneness by breaking a slice in half to ensure no moisture remains in the center.
What is the best oven temperature for drying fruit?
The ideal temperature for drying fruit in oven is between 200°F and 250°F. This low heat removes moisture slowly without cooking or burning the fruit. Higher temperatures will cook the apples instead of drying them, resulting in a chewy texture rather than the crispy chips most people prefer. Keeping the temperature low and steady is the key to perfect oven dried apples.
Can I use a convection oven for drying apples?
Absolutely. A convection oven is actually excellent for fruit dehydration because the fan circulates hot air evenly around the food. You can lower the temperature by about 25°F when using a convection setting. The airflow helps slices dry faster and more uniformly, which makes convection ovens a great food dehydrator alternative for making homemade apple chips.
Are oven dried apples healthy?
Yes, oven dried apples are a healthy snack option. They retain most of the fiber and nutrients found in fresh apples. The drying process concentrates the natural sugars, so they taste sweeter but still contain no added sugar unless you add it yourself. They make a wonderful dried fruit snacks choice for kids and adults alike, providing natural energy and satisfying crunch.
How do I rehydrate dried apples if they become too hard?
If your crispy apple treats become overly hard, you can rehydrate them by soaking them in warm water for 10 to 15 minutes. This softens them and restores some of their original texture. Rehydrated dried apples work wonderfully in baked goods like pies, cakes, and bread. They also make a great addition to oatmeal or warm cereal in the morning.