How To Change The Time On A GE Oven With These Steps
Changing the time on your GE oven is a simple process that anyone can do in just a few minutes. Whether you own a GE Profile oven, a GE built-in oven, or a GE over-the-range model, the steps are similar and easy to follow. This guide walks you through every method, from basic clock setting to resetting the GE oven clock after a power outage. You will also learn how to fix common GE oven time problems and keep your display accurate all year long.
Have you ever walked into your kitchen and realized your GE oven clock is showing the wrong time? It happens to everyone. Maybe the power flickered overnight, or you just moved into a new home and need to set everything up. Whatever the reason, knowing how to change the time on a GE oven is a basic skill every home cook should have.
The good news is that it is not hard at all. Most GE oven models follow a similar process for adjusting the clock. Whether you have a sleek GE Profile oven, a classic GE built-in oven, or even a GE over-the-range model, the steps are straightforward. In this guide, we will walk you through every method, from the basics to troubleshooting tricky issues. By the end, you will feel confident adjusting your GE oven clock anytime it needs updating.
We will also cover things like resetting the clock after a power outage, switching between 12-hour and 24-hour formats, and fixing common display problems. Let us get started so your GE oven is showing the correct time once again.
Key Takeaways
- Easy Process: Changing the time on a GE oven takes only a few simple steps, no matter the model.
- Multiple Methods: You can use the control panel buttons, the timer knob, or the smart app depending on your GE oven type.
- Power Outage Fix: A reset is usually all it takes to restore the GE oven clock after an electrical interruption.
- Time Format Options: You can switch between 12-hour and 24-hour time on most GE oven models.
- Common Issues Are Fixable: Blank displays and unresponsive buttons often have simple solutions you can try at home.
- Regular Maintenance Helps: Keeping your GE oven clock accurate prevents cooking mistakes and missed timers.
📑 Table of Contents
Understanding Your GE Oven Control Panel
Before you change the time, it helps to know what you are looking at. Every GE oven has a control panel with buttons and a display. The layout varies by model, but the basic setup is similar across most units. Understanding your panel makes the whole process much easier.
What Do the Buttons on Your GE Oven Look Like?
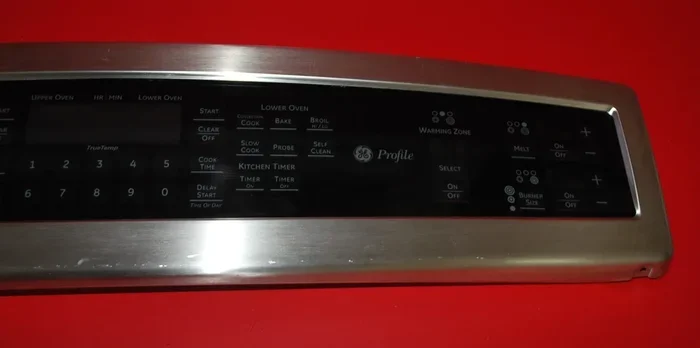
Most GE ovens have a set of touchpad buttons or physical knobs. Common buttons include Time Cook, Bake, Broil, Timer, Clock, and Clear. On newer models, you may see a digital touchscreen with icons instead of physical buttons. The GE oven display usually shows the current time, cooking temperature, or timer settings.
If you are not sure which button controls the clock, look for a button labeled “Clock” or an icon that looks like a clock face. Some older GE models use a single dial that you press and turn to adjust the time. Newer GE digital ovens often use a dedicated button that you hold down to enter clock-setting mode.
Different GE Oven Models and Their Displays
GE makes several types of ovens, and each one handles time settings a little differently. Here are the most common types you might encounter:
- GE Traditional Electric Ovens: These use a simple digital display with physical buttons. The clock setting is usually found by pressing the Clock button.
- GE Profile Ovens: These models often feature a touchscreen or advanced touchpad. The time-setting process may involve tapping a clock icon and using arrow keys.
- GE Built-In Ovens: Built-in models typically have a sleeker control panel. Some use a dial-and-button combination for setting the GE oven time.
- GE Over-the-Range Ovens: These combo units include a microwave and oven. The clock setting may be shared between both functions or separate.
- GE Smart Ovens: Wi-Fi-enabled models let you change the time through the GE app on your phone, in addition to the control panel.
No matter which type you have, the basic principle is the same. You need to enter the clock-setting mode, adjust the numbers, and save your changes. Let us walk through the exact steps now.
How To Change The Time On A GE Oven
Now let us get into the actual steps. This section covers the most common method for adjusting the time on your GE oven. Follow along carefully, and you will have the correct time showing in no time.
Steps for GE Traditional Ovens
For most standard GE electric and gas ovens, the process is simple and fast. Here is exactly what to do:
- Press the Clock button. This is usually located on the top row of the control panel. Press it once to enter clock-setting mode. You should see the hours digits start blinking on the display.
- Use the arrow keys to adjust the hours. Press the up or down arrow to increase or decrease the hour. On some models, you may need to press the “+” or “-” button instead.
- Press the Clock button again. This moves the cursor to the minutes section. The minutes digits will now blink.
- Adjust the minutes using the arrow keys. Set the correct minutes the same way you set the hours.
- Press the Clock button one more time. This saves your new time setting. The display should stop blinking and show the updated time.
That is it! Your GE oven clock should now display the correct time. If the display does not respond, make sure the oven is plugged in or that the circuit breaker has not tripped.
Steps for GE Smart Ovens and Touchscreen Models
If you have a newer GE Profile oven or a touchscreen model, the process is slightly different but just as easy:
- Tap the Clock icon on the touchscreen. The icon usually looks like a small clock face. Tapping it brings up the time-setting screen.
- Select Hours or Minutes. On the touchscreen, you can tap the field you want to change. The digits will become editable.
- Use the on-screen arrows or type in the new time. Some touchscreen models let you scroll through numbers, while others let you tap each digit directly.
- Tap Save or Confirm. Once you have set the correct time, tap the save button. The display will update to show your new setting.
If your GE oven is connected to Wi-Fi, you can also change the time through the GE app on your smartphone. Open the app, go to your oven settings, and look for the clock or time option. This is especially handy if you want to adjust the time without standing at the oven.
Quick Tips for Setting the Time
- Always use the correct time zone for your location when setting the clock.
- If your oven was unplugged or lost power, the clock may reset to 12:00 or show blanks. You will need to re-enter the time.
- Some GE ovens automatically adjust for daylight saving time if connected to Wi-Fi. Check your settings to confirm.
- Keep your oven manual handy. The GE oven manual has model-specific instructions that can help if the standard steps do not work.
How To Reset The Clock On A GE Oven After a Power Outage
Power outages are frustrating, and they often reset your GE oven clock to a default or blank state. When the clock shows 12:00, blanks, or starts flashing after the power comes back, you need to reset it. The good news is that this is a quick fix.
When the Clock Shows Blank or Flashing
If your GE oven display is blank or the time is flashing after a power outage, follow these steps:
- Make sure the oven has power. Check that the oven is plugged in and the outlet is working. You can also check your kitchen circuit breaker to see if it tripped during the outage.
- Press the Clock button. This should wake up the display and enter clock-setting mode. If the display is completely unresponsive, try unplugging the oven for 30 seconds and plugging it back in.
- Set the correct time using the steps above. Use the arrow keys or touchscreen to enter the current time.
- Save the setting by pressing Clock again. The display should stop blinking and show the correct time.
In some cases, the GE oven clock reset may require you to hold the Clock button for three to five seconds. This forces the oven into clock-setting mode. Check your specific model in the GE oven manual if a simple press does not work.
Do You Need to Reset Other Settings Too?
After a power outage, some GE oven settings may also reset. Your preferred cooking mode, temperature units (Fahrenheit or Celsius), and any saved cooking programs may revert to defaults. Take a moment to check these settings and adjust them back to your preferences. This is a good habit to build after any power interruption.
Changing Time Format: 12-Hour vs 24-Hour on GE Ovens
Some people prefer the 12-hour clock with AM and PM, while others like the 24-hour military-style format. Good news: most GE oven models let you switch between the two. Here is how to do it.
Switching on Traditional GE Ovens
On most standard GE ovens, you can switch the time format by holding down the Clock button for a few seconds. The display may show “12h” or “24h” to indicate which format is currently active. Press the button again to toggle between the two formats. The clock will update to show the correct time in the new format automatically.
Switching on GE Smart Ovens
On touchscreen and smart models, go to the Settings menu on the display. Look for “Clock Format” or “Time Format.” Tap it and select either 12-hour or 24-hour. The change takes effect immediately, and your GE oven time setting will update to match.
If you cannot find the time format option, consult your GE oven manual or visit the GE support website. Enter your model number to find specific instructions for your unit.
Common Time-Related Issues and How To Fix Them
Sometimes changing the time on your GE oven does not go smoothly. Here are the most common issues people run into and how to solve them.
GE Oven Clock Not Updating
If you press the Clock button and nothing happens, or the display does not change, try these fixes:
- Check the power supply. Make sure the oven is receiving electricity. A tripped breaker or a loose plug can prevent the control panel from working.
- Try holding the Clock button longer. Some models require a longer press to enter clock-setting mode. Hold it for five seconds and see if the display responds.
- Clear any error codes. If your GE oven display shows an error code instead of the time, refer to the manual for that specific code. Clearing the error may restore normal clock function.
- Perform a factory reset. As a last resort, you can reset the oven to factory settings. This clears all custom settings, including the clock. You will need to set the time again after the reset.
Buttons Not Responding on the GE Oven Panel
If the buttons on your GE oven control panel are unresponsive, the clock cannot be adjusted. Here is what to try:
- Clean the buttons or touchscreen with a soft, damp cloth. Grease and food residue can build up and prevent proper contact.
- Check for moisture inside the control panel. If the oven was exposed to steam or spills, the buttons may stick temporarily.
- Wait a few minutes and try again. Sometimes the control panel needs a moment to recover from a glitch.
- If none of these steps work, the control board may need replacement. Contact GE customer support or a qualified technician for help.
Tips To Keep Your GE Oven Clock Accurate
Once you have set the correct time on your GE oven, you want to keep it accurate. Here are some simple tips that help.
- Check the time regularly. Make it a habit to glance at your GE oven clock once a week. This helps you catch any drift early.
- Enable automatic time sync if available. Wi-Fi-connected GE ovens can sync with internet time servers. This keeps the clock accurate without any manual input.
- Replace the display battery if needed. Some GE oven models have a small backup battery that keeps the clock running during power outages. If the clock resets frequently, the battery may need replacing.
- Note daylight saving time changes. Most modern GE ovens adjust automatically for daylight saving time if connected to Wi-Fi. If yours does not, remember to adjust the clock manually in the spring and fall.
- Keep the manual accessible. Store your GE oven manual in a kitchen drawer or save a digital copy on your phone. It is invaluable for troubleshooting any control panel issues.
Taking these small steps ensures your GE oven clock stays accurate and your cooking experience remains smooth. A correctly set clock also helps you use the timer function properly, so your food never gets overcooked or undercooked.
Conclusion
Changing the time on your GE oven is a quick and easy task once you know the steps. Whether you have a traditional GE oven, a GE Profile model, or a smart touchscreen unit, the process follows a similar pattern. Press the Clock button, adjust the hours and minutes, and save your setting. If a power outage resets the clock, simply repeat the same steps to get back on track.
Remember to check your time format, keep the display clean, and address any issues promptly. A working GE oven clock makes your kitchen run more smoothly and helps you stay on top of cooking times. With the tips and troubleshooting steps in this guide, you are now fully equipped to handle any GE oven time setting challenge that comes your way.
Take a moment right now to check your oven clock. If it is off, spend a few minutes to fix it. You will be glad you did the next time you are cooking and relying on that display to keep track of time.
Frequently Asked Questions
Why does my GE oven clock keep resetting?
This usually happens after a power outage or if the backup battery is dying. Check your oven’s circuit breaker and replace the backup battery if your model has one. If the problem continues, the control board may need professional inspection.
Can I change the time on my GE oven using my phone?
Yes, if you have a Wi-Fi-connected GE smart oven. Download the GE app, connect to your oven, and navigate to the clock settings. From there, you can adjust the time remotely just like you would on the oven’s display.
What should I do if the Clock button on my GE oven does not work?
First, try cleaning the button area with a damp cloth. If that does not help, hold the Clock button for five to ten seconds to see if it responds. You can also try unplugging the oven for one minute and plugging it back in. If none of these steps work, contact GE support.
How do I know if my GE oven is set to 12-hour or 24-hour time?
On most GE ovens, the display will show “12h” or “24h” when you press the Clock button. Smart models let you check this in the Settings menu under Clock Format. If you are unsure, simply switch the format and see which one matches your preferred style.
Do all GE oven models use the same steps to change the time?
Most GE ovens follow a similar process, but there can be small differences between models. Traditional ovens use physical buttons, while smart models may have touchscreens or app controls. Always refer to your specific model’s manual for the most accurate instructions.
Can a power surge damage the GE oven clock?
In rare cases, a severe power surge can affect the control panel and clock function. If your oven clock stops working after a surge, try resetting the oven by unplugging it for 30 seconds. If the clock still does not work, you may need a technician to check the control board.