How Do You Roast Garlic Cloves In The Oven Step By Step
Roasting garlic cloves in the oven is one of the simplest ways to unlock deep, sweet flavor in your cooking. This guide shows you exactly how do you roast garlic cloves in the oven with clear, easy steps anyone can follow. You will learn the right temperature, timing, and prep tricks that make roasted garlic taste amazing every time. Whether you are a beginner or a home cook looking to level up, this method works perfectly for you.
There is something magical about roasted garlic. The moment you pull a tray of golden garlic cloves out of the oven, your kitchen fills with a warm, nutty aroma that is impossible to ignore. How do you roast garlic cloves in the oven? It is easier than you think, and once you try it, you will wonder why you never started sooner.
This guide walks you through every single step of how do you roast garlic cloves in the oven. From choosing the right garlic to storing your finished product, you will find everything you need here. Whether you want to make a simple roasted garlic spread or add depth to your favorite recipes, this method delivers every time.
The beauty of oven roasted garlic lies in its simplicity. You need very few ingredients, almost no prep time, and a standard home oven. The result is soft, sweet, and caramelized garlic that transforms ordinary dishes into something extraordinary. Let us dive in.
Key Takeaways
- Simple Process: Roasting garlic cloves in the oven requires just a few basic ingredients and tools.
- Perfect Temperature: 400°F is the sweet spot for getting golden, caramelized garlic every time.
- Quick Prep: Trimming, seasoning, and wrapping garlic takes less than five minutes.
- Versatile Result: Soft roasted garlic can be used in spreads, dips, sauces, and more.
- Easy Storage: You can store roasted garlic in the fridge for up to a week.
- No Special Skills Needed: This method is beginner-friendly and hard to mess up.
📑 Table of Contents
- What Is Roasted Garlic and Why Do People Love It?
- What You Need to Roast Garlic Cloves in The Oven
- How Do You Roast Garlic Cloves In The Oven Step By Step
- Tips for Perfect Roasted Garlic Every Time
- Creative Ways to Use Your Roasted Garlic
- Common Mistakes to Avoid When Roasting Garlic
- How to Store and Reheat Roasted Garlic
- Frequently Asked Questions
- Conclusion
What Is Roasted Garlic and Why Do People Love It?
Roasted garlic is regular garlic that has been slow-cooked in an oven until it becomes soft, golden, and sweet. The heat breaks down the sharp, pungent compounds in raw garlic and replaces them with a mild, buttery, nutty garlic flavor. Many people describe the taste as similar to roasted onions or caramelized butter.
The process of garlic baking creates a completely different experience from raw or sautéed garlic. Raw garlic can be sharp and overpowering, but roasted garlic is gentle and mellow. This makes it a perfect ingredient for people who love garlic but do not want the intense bite.
People use roasted garlic in many ways. You can spread it on bread, mix it into mashed potatoes, stir it into soups, or blend it into dressings. It also makes an excellent garlic side dish on its own. Once you learn how do you roast garlic cloves in the oven, you will find yourself adding it to almost everything you cook.
The Science Behind Roasting Garlic
When garlic is exposed to dry heat, a process called the Maillard reaction takes place. This is the same reaction that makes roasted onions sweet and gives bread its golden crust. The natural sugars in garlic caramelize, creating those complex, deep flavors we love.
At the same time, the sharp compound called allicin breaks down. Allicin is what makes raw garlic smell strong and taste spicy. As the garlic roasts, allicin converts into sweeter, milder compounds. This is why soft roasted garlic tastes so different from raw garlic.
What You Need to Roast Garlic Cloves in The Oven
Before you start, make sure you have everything ready. The good news is that you do not need any fancy equipment or hard-to-find ingredients. Here is your simple shopping and prep list.
Ingredients You Will Need:
- One whole garlic bulb or several individual garlic cloves
- Olive oil or melted butter
- A pinch of salt
- Freshly cracked black pepper (optional)
- A small sprinkle of dried herbs like thyme or rosemary (optional)
Tools You Will Need:
- A baking sheet or oven-safe dish
- Parchment paper or aluminum foil
- A sharp knife
- A cutting board
- A small bowl for tossing
When choosing your garlic heads, look for firm bulbs with tight skin. Avoid garlic that feels soft or has green sprouts growing out of the top. Fresh garlic gives the best garlic flavor after roasting.
Preparing Your Garlic for the Oven
Garlic preparation is the first and most important step. Proper prep ensures even cooking and the best results. Start by separating the cloves from the bulb. You do not need to peel them completely — just remove the outermost layer of papery skin.
Next, trim about a quarter-inch off the top of each clove. This exposes the inner flesh and helps the garlic cook evenly. Place the trimmed cloves in a bowl and drizzle with olive oil. Toss them gently to coat every clove evenly.
Now you are ready to learn how do you roast garlic cloves in the oven step by step. The process is straightforward and almost impossible to get wrong.
How Do You Roast Garlic Cloves In The Oven Step By Step
How do you roast garlic cloves in the oven? Follow these simple steps and you will have perfect results every single time. This method works whether you are roasting a whole head or just a few loose cloves.
Step 1: Preheat Your Oven
Set your oven to 400°F (200°C). Allow it to fully preheat before placing the garlic inside. A properly heated oven ensures the garlic starts cooking immediately, which leads to even garlic roasting and better caramelization.
If you prefer a slower roast, you can set the oven to 375°F. This extends the garlic cooking time slightly but can produce an even sweeter result. The lower temperature gives the sugars more time to develop.
Step 2: Arrange the Garlic on Your Baking Sheet
Line a baking sheet with parchment paper or foil. Place the oiled garlic cloves in a single layer with space between each clove. Do not overcrowd the pan. Giving each clove room to breathe allows hot air to circulate evenly.
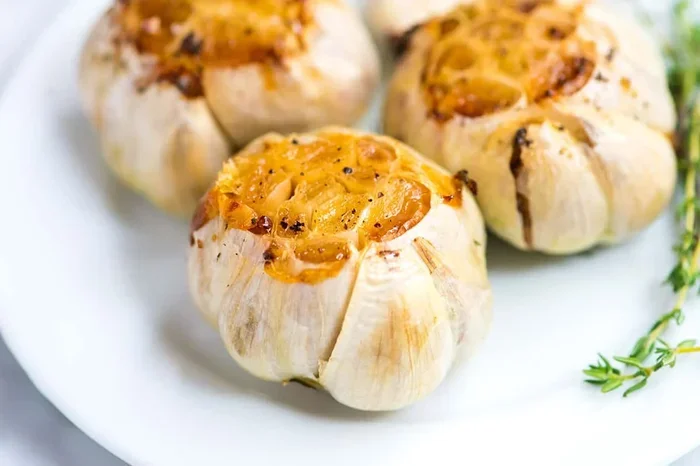
If you are roasting a whole garlic head, slice off the top quarter-inch to expose the cloves inside. Drizzle olive oil over the exposed surface and wrap the entire head tightly in foil. This traps moisture and steams the garlic while it roasts.
Step 3: Roast the Garlic
Place the baking sheet in the oven on the middle rack. For loose cloves, roast for 20 to 25 minutes. For a whole wrapped head, roast for 30 to 40 minutes. The garlic roast time depends on the size of your cloves and how dark you like them.
Check the garlic halfway through cooking. You want the cloves to turn golden brown on the edges. Some darker spots are fine — they add extra flavor. If the cloves are browning too quickly, loosely tent the pan with foil to slow down the process.
Step 4: Check for Doneness
The best way to tell if your oven roasted garlic is ready is to squeeze a clove gently. When the garlic feels soft and squishy, like a ripe tomato, it is done. The inside should be a rich golden color.
If the garlic still feels firm, give it another 5 to 10 minutes in the oven. Every oven is slightly different, so keep an eye on it during the last few minutes of cooking.
Step 5: Let It Cool and Store
Remove the garlic from the oven and let it cool for about 10 minutes. The cloves will be hot, so handle them carefully. Once cooled, you can use them right away or store them for later.
To store roasted garlic, place the cloves in an airtight container. They will keep in the refrigerator for up to one week. You can also submerge them in olive oil in a sealed jar, which adds extra flavor and keeps them moist.
Tips for Perfect Roasted Garlic Every Time
Mastering how do you roast garlic cloves in the oven is easy, but a few pro tips can take your results from good to amazing. Here are the best tips from experienced cooks.
Use Quality Olive Oil: Good olive oil adds flavor and helps the garlic roast evenly. Avoid using cooking spray, as it does not coat the cloves as well.
Do Not Skip the Parchment Paper: Parchment paper prevents sticking and makes cleanup a breeze. It also promotes even browning on the bottom of the cloves.
Add Herbs for Extra Flavor: Tossing the garlic with fresh thyme, rosemary, or a sprinkle of red pepper flakes takes your roasted garlic recipe to the next level. These herbs infuse into the garlic as it roasts.
Let the Garlic Rest After Roasting: Giving the garlic a few minutes to cool allows the flavors to settle and become more concentrated. Rushing this step can lead to a less flavorful result.
Experiment with Temperature: Try roasting at 375°F for a sweeter, milder result, or 425°F for a nuttier, more caramelized flavor. Both approaches work beautifully for garlic baking.
Quick Tips for Best Results
- Always preheat your oven before placing the garlic inside.
- Leave the skin on the cloves — it peels off easily after roasting.
- Use a single layer on the baking sheet for even cooking.
- Add a tiny splash of water to the pan if the garlic looks dry.
- Roast extra garlic — it keeps well and is always handy.
Creative Ways to Use Your Roasted Garlic
Once you have mastered how do you roast garlic cloves in the oven, the fun really begins. Roasted garlic is incredibly versatile and works in so many dishes. Here are some of the best ways to use it.
Roasted Garlic Spread
One of the most popular uses for roasted garlic is making a spread. Simply squeeze the soft cloves out of their skins and mash them with a fork. Mix in a little butter, cream cheese, or Greek yogurt. Spread it on toast, crackers, or fresh bread. This roasted garlic spread is addictive and pairs perfectly with fresh vegetables.
Garlic Butter
Blend roasted garlic with softened butter and a pinch of salt. This makes an incredible garlic butter for steak, seafood, or vegetables. You can also melt it over pasta or use it to make garlic bread. The flavor is far more complex and sweet than using raw garlic.
Soups and Sauces
Stir soft roasted garlic into soups, stews, or homemade sauces. It dissolves beautifully and adds a rich, savory depth. Roasted garlic works especially well in tomato-based sauces, potato soups, and creamy Alfredo sauces.
Dips and Dressings
Blend roasted garlic into hummus, aioli, or homemade salad dressings. The mild sweetness of roasted garlic balances tangy ingredients like lemon juice and vinegar. It makes any dip or dressing taste restaurant-quality.
Roasted Vegetables and Proteins
Toss roasted garlic cloves into a pan of vegetables before roasting them. The garlic infuses the vegetables with its sweet flavor. You can also mash roasted garlic into a paste and rub it on chicken, fish, or tofu before cooking.
Common Mistakes to Avoid When Roasting Garlic
Even though roasting garlic is simple, a few common mistakes can ruin your results. Here is what to watch out for when making oven roasted garlic.
Overcrowding the Pan: If you place too many cloves too close together, they will steam instead of roast. This leads to pale, mushy garlic instead of golden, caramelized cloves. Always give each clove enough space.
Using Too Much Oil: A little olive oil goes a long way. Too much oil can make the garlic greasy and prevent proper browning. Just enough to coat each clove lightly is perfect.
Not Watching the Time: Every oven runs a little differently. Set a timer and check the garlic a few minutes before the suggested garlic roast time ends. Burnt garlic turns bitter and cannot be saved.
Peeling Before Roasting: Leave the skin on during roasting. The skin protects the cloves and makes them easier to handle. You can peel the skin off easily once the garlic is cooked and cooled.
Skipping the Preheat: Putting garlic into a cold oven leads to uneven cooking. The garlic will cook too slowly and may not develop the proper caramelization. Always preheat first.
Comparison Table: Roasting Garlic at Different Temperatures
| Temperature | Roast Time | Flavor Profile | Best For |
|---|---|---|---|
| 375°F | 30-40 minutes | Sweet, mild, buttery | Spreads and dips |
| 400°F | 20-25 minutes | Balanced sweet and nutty | General purpose use |
| 425°F | 15-20 minutes | Bold, nutty, caramelized | Pasta and pizza toppings |
How to Store and Reheat Roasted Garlic
Proper storage keeps your roasted garlic fresh and flavorful for days. The best method is to place cooled cloves in an airtight container and refrigerate them. They will stay good for up to seven days in the fridge.
You can also freeze roasted garlic for longer storage. Place the cloves on a parchment-lined tray, freeze them until solid, then transfer them to a freezer bag. Frozen roasted garlic lasts for up to three months.
To reheat roasted garlic, warm it in a skillet over low heat with a drizzle of olive oil. You can also microwave it for 15 to 20 seconds. The flavor may soften slightly after reheating, but it still tastes wonderful.
Another great storage option is to blend the roasted garlic into olive oil and store it in the refrigerator. This creates a ready-to-use garlic oil that adds instant flavor to any dish. Just make sure to keep the oil refrigerated and use it within a week for food safety.
Frequently Asked Questions
Can I roast garlic without foil?
Yes, you absolutely can roast garlic without foil. When roasting loose cloves on a baking sheet, foil is optional. The parchment paper does most of the work. If you are roasting a whole garlic head, foil helps trap moisture and steam, which keeps the garlic soft. Without foil, the head may roast a bit faster and develop a slightly firmer texture on the outside.
How do I know when roasted garlic is done?
The easiest way to check is to squeeze the base of a clove gently. When it feels soft and squishy, like a ripe tomato, it is done. The cloves should also have a golden brown color on the edges. If they still feel firm or look pale, give them another 5 to 10 minutes in the oven.
Can I use roasted garlic in place of raw garlic in recipes?
Absolutely. Roasted garlic has a much milder and sweeter flavor than raw garlic. You can substitute it in most recipes, but you may need to use a bit more to match the intensity of raw garlic. Start with one roasted clove where a recipe calls for one raw clove, and adjust to taste.
What is the best way to peel roasted garlic cloves?
The skin slides right off after roasting. Simply squeeze the base of the clove with your fingers or the back of a spoon, and the soft garlic will pop right out of the skin. If a little skin sticks, just peel it off. The warm, soft cloves make this process very easy and quick.
Can I roast garlic ahead of time?
Yes, roasting garlic ahead of time is a great time-saving strategy. You can roast garlic a day or two before you plan to use it. Store it in an airtight container in the refrigerator. Roasted garlic also freezes well, so you can make a big batch and save it for future meals.
Why is my roasted garlic bitter?
Bitter roasted garlic usually means it was overcooked or roasted at too high a temperature. The garlic burned on the edges and developed a bitter taste. To prevent this, keep an eye on the garlic during the last 10 minutes of cooking. If the cloves are browning too fast, lower the oven temperature by 25 degrees and extend the cooking time slightly.
Conclusion
How do you roast garlic cloves in the oven? Now you know the complete answer. From preheating your oven to storing the finished product, this guide has covered every detail you need. Roasting garlic cloves in the oven is a simple, rewarding skill that elevates your cooking and adds incredible depth to your meals.
The process is forgiving and flexible. You can adjust the temperature, timing, and seasonings to suit your taste. Whether you prefer a mild, buttery result or a bold, caramelized flavor, oven roasted garlic delivers every time.
Start with the basic method, and then experiment with herbs, different temperatures, and creative uses. Once you make roasted garlic a regular part of your cooking routine, you will never go back to using it raw. Grab a garlic bulb, fire up your oven, and enjoy the wonderful world of roasted garlic today.