How To Roast Kabocha Squash In The Oven Perfectly Today
Roasting kabocha squash in the oven is one of the simplest ways to bring out its naturally sweet, nutty flavor. This guide walks you through every step, from picking the right squash at the store to getting perfectly caramelized edges in your own kitchen. You will learn the ideal oven temperature, timing, prep tricks, and creative serving ideas that make roast kabocha squash a weeknight staple. Whether you are a beginner or a seasoned cook, these tips will help you nail it every single time.
Few things in the kitchen feel as rewarding as pulling a tray of roast kabocha squash out of the oven. The edges are golden and slightly crispy. The inside is soft, creamy, and bursting with natural sweetness. It smells like autumn in every bite.
Kabocha squash, sometimes called Japanese pumpkin, has become a favorite among home cooks. Its deep green skin and vibrant orange flesh make it beautiful on the plate. And its flavor? Rich, buttery, and almost like a cross between sweet potato and pumpkin. Best of all, roasting it in the oven is incredibly easy. You do not need fancy equipment or advanced cooking skills.
In this guide, we will walk you through everything you need to know about roast kabocha squash in the oven. We cover how to pick the best squash at the store, how to prep it properly, the ideal oven temperature and timing, and creative ways to use your roasted harvest. By the end, you will feel confident enough to make this dish a regular part of your meal rotation.
Key Takeaways
- Simple Prep: Cutting, seeding, and optionally peeling kabocha squash takes only a few minutes with the right technique.
- Perfect Temperature: Roasting at 400°F to 425°F gives you the best caramelization and creamy interior.
- Versatile Ingredient: Roasted kabocha squash works in soups, salads, pastas, tacos, and even desserts.
- Nutrient-Rich: Kabocha squash is packed with vitamins A and C, fiber, and antioxidants.
- Common Mistakes Are Easy to Avoid: Skip overcrowding the pan, always dry the seeds, and let the squash cool slightly before handling.
- Storage Is Easy: Roasted kabocha keeps in the fridge for up to 5 days and freezes well for meal prep.
📑 Table of Contents
- What Is Kabocha Squash and Why Should You Roast It?
- How To Prepare Kabocha Squash for the Oven
- The Best Oven Temperature and Time for Roasting Kabocha Squash
- Step-by-Step Guide to Roasting Kabocha Squash in the Oven
- Creative Ways To Use Roasted Kabocha Squash
- Common Mistakes to Avoid When Roasting Kabocha Squash
- Storing and Reheating Roasted Kabocha Squash
- Nutritional Benefits of Kabocha Squash
- Expert Insights on Perfecting Your Roast Kabocha Squash
- Conclusion
What Is Kabocha Squash and Why Should You Roast It?
Kabocha squash is a type of winter squash that originated in Japan. It has a round or squat shape with dark green skin, often featuring light green stripes or bumps. The flesh inside is a deep orange-yellow color and feels dense and creamy when cooked.
People love kabocha for many reasons. The flavor is naturally sweet without being overly sugary. It has a nutty, almost chestnut-like quality that sets it apart from other squashes. When you roast kabocha squash, the natural sugars caramelize. This creates a rich depth of flavor that boiling or steaming simply cannot match.
Here are some reasons why oven-roasted kabocha deserves a spot on your table:
- Nutrient Density: Kabocha is loaded with beta-carotene, vitamin C, potassium, and dietary fiber. These nutrients support eye health, immunity, and digestion.
- Low Calorie, High Satisfaction: A cup of roasted kabocha has around 40 calories. It fills you up without weighing you down.
- Meal Prep Friendly: Roasted kabocha stores well in the fridge for up to five days. You can batch cook on Sunday and use it all week.
- Diet-Friendly: It works beautifully in vegan, paleo, gluten-free, and keto-friendly recipes.
- Budget-Friendly: A whole kabocha squash is inexpensive and goes a long way in the kitchen.
Kabocha vs. Other Winter Squashes
You might be wondering how kabocha compares to butternut or acorn squash. Each has its strengths. Butternut squash has a more mild, slightly nutty flavor. Acorn squash is sweeter and more fibrous. Kabocha falls right in the middle with a rich, creamy texture and a deeper sweetness. When it comes to roasting kabocha squash, the results are often more consistently creamy and flavorful than other varieties.
Compared to butternut squash, kabocha has fewer stringy fibers. This makes it easier to cube and roast evenly. The skin of kabocha is thinner than some other winter squashes, and it softens nicely when roasted. Some people eat the skin after roasting, though many prefer to peel it off first.
How To Prepare Kabocha Squash for the Oven
Proper preparation is the key to perfect roasted kabocha squash. The good news is that prep does not take long. With the right tools and a little know-how, you can have your squash in the oven in under 15 minutes.
What You Will Need
- A sharp chef’s knife or sturdy santoku knife
- A large cutting board
- A sturdy spoon or ice cream scoop for seeds
- A baking sheet or roasting pan
- Parchment paper or a silicone baking mat
- Olive oil or avocado oil
- Salt and any desired seasonings
Step 1: Wash and Dry the Squash
Start by rinsing the outside of the kabocha under cool running water. Use a vegetable brush if you have one. The skin can carry dirt and residue from the field or store. Dry it thoroughly with a clean towel. A dry surface helps the squash crisp up better during roasting.
Step 2: Cut the Squash in Half
This is the trickiest part. Kabocha squash has a very tough skin and a round shape that can roll around. Here is a simple trick that makes cutting safe and easy:
- Place a damp kitchen towel under your cutting board. This prevents the squash from sliding.
- Hold the squash steady with one hand, placing your fingers well away from the blade.
- Use a heavy, sharp knife to cut through the stem end first.
- Then cut through the blossom end to create two halves.
If the squash is too hard to cut through in one go, do not force it. Use a heavy knife and tap the back of the blade gently with a wooden spoon. This helps the knife work through the tough skin without slipping.
Step 3: Scoop Out the Seeds
Use a large spoon to scrape out the seeds and stringy pulp from each half. You can save the seeds for roasting later. Kabocha squash seeds are edible and delicious when seasoned and baked. They make a great snack on their own.
Step 4: Peel or Leave the Skin
You have a choice here. Some people prefer to peel the skin off before roasting. This works well if you want smaller, more uniform pieces. A vegetable peeler or a sharp paring knife does the job. The skin will soften during roasting and becomes edible, but many people find it easier to remove before cutting.
Other cooks prefer to leave the skin on. This is faster and helps the pieces hold their shape during roasting. The skin also adds extra fiber to your dish. If you leave the skin on, just make sure to cut the squash into smaller, bite-sized pieces so the skin softens fully.
Step 5: Cube or Slice
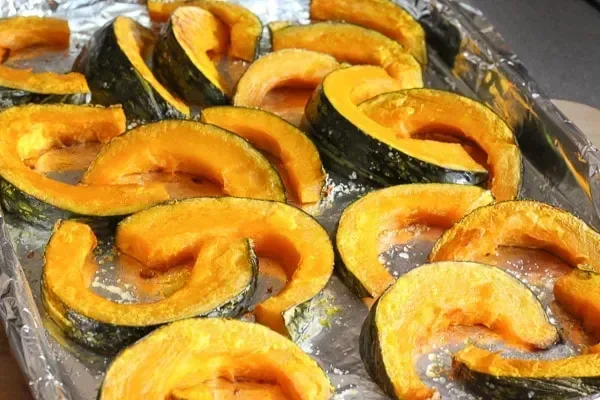
Cut the squash into roughly 1-inch cubes for even roasting. If you prefer larger pieces, go for 1.5-inch chunks. For a different texture, you can also slice the squash into half-moons or wedges. The size you choose affects roasting time, so keep that in mind.
Step 6: Season and Oil
Place the cubed squash in a large bowl. Drizzle with olive oil or avocado oil. Add salt and toss well to coat every piece evenly. You can also add garlic powder, paprika, cumin, or a sprinkle of cinnamon for a sweeter profile. The oil helps the squash caramelize and prevents sticking.
The Best Oven Temperature and Time for Roasting Kabocha Squash
Getting the temperature right makes all the difference when you roast kabocha squash in the oven. Too low and the squash steams instead of caramelizing. Too high and the edges burn before the inside cooks through.
Recommended Temperature Range
The sweet spot for oven-roasted kabocha is between 400°F and 425°F (200°C to 220°C). At this temperature, the outside edges brown and crisp while the inside becomes tender and creamy. Most home ovens run a little hot or cool, so keep an eye on your squash during the last 10 minutes.
Roasting Time Guidelines
Roasting time depends on the size of your cubes and the temperature you use. Here is a general guide:
- 1-inch cubes at 400°F: 25 to 30 minutes
- 1-inch cubes at 425°F: 20 to 25 minutes
- 1.5-inch chunks at 400°F: 30 to 35 minutes
- Wedges or half-moons at 425°F: 25 to 30 minutes
The best way to tell if your roasted kabocha squash is done is to poke a piece with a fork. It should slide in easily with no resistance. The edges should be golden brown and slightly crispy. If the squash looks pale, give it a few more minutes.
Should You Flip the Squash?
Yes, flipping the pieces halfway through roasting helps them cook evenly. Use a spatula to gently turn each piece. This exposes all sides to the heat and promotes even caramelization. If you are using a parchment-lined baking sheet, flipping is even easier since the pieces will not stick.
Step-by-Step Guide to Roasting Kabocha Squash in the Oven
Now that you know the basics, here is a complete walkthrough for making perfect roast kabocha squash in your own kitchen.
Step 1: Preheat the Oven
Turn your oven to 425°F and let it fully heat up. Preheating is important. Putting cold squash into a cold oven leads to uneven cooking and soggy results. Give your oven at least 10 to 15 minutes to reach the right temperature.
Step 2: Prep the Baking Sheet
Line a rimmed baking sheet with parchment paper or a silicone baking mat. This prevents sticking and makes cleanup a breeze. If you do not have parchment, a light coat of oil on the sheet works too.
Step 3: Spread the Squash in a Single Layer
Arrange the seasoned squash cubes in a single layer on the baking sheet. Do not crowd the pan. Overcrowding traps steam and prevents caramelization. If you have a lot of squash, use two baking sheets or roast in batches. The pieces should have space between them, with no more than one layer deep.
Step 4: Roast and Monitor
Place the baking sheet on the middle rack of your oven. Set a timer for 20 minutes. When the timer goes off, open the oven and use a spatula to flip each piece. Roast for another 10 to 15 minutes, or until the edges are golden brown and the fork test passes.
Step 5: Cool and Serve
Remove the baking sheet from the oven and let the squash cool for about 5 minutes. The pieces will continue to firm up as they cool. Serve warm as a side dish, toss into salads, or add to your favorite recipes. The aroma alone is worth the wait.
Quick Tips for Better Results
- Use a rimmed baking sheet: This prevents oil and juices from dripping into your oven.
- Do not skip the oil: Even a thin coat of oil promotes browning and flavor.
- Season after oiling: Salt sticks better to oiled surfaces, so oil first, then season.
- Use a silicone spatula: It gently turns pieces without breaking them apart.
- Check multiple pieces: Poke different cubes to make sure the whole batch is done.
Creative Ways To Use Roasted Kabocha Squash
Once you have a batch of roast kabocha squash ready, the possibilities are nearly endless. This versatile ingredient works in so many dishes across different cuisines.
1. Roasted Kabocha Soup
Blend roasted kabocha with vegetable broth, a touch of coconut milk, and warming spices like ginger and nutmeg. You get a velvety smooth soup that is comforting and full of flavor. Top with toasted pumpkin seeds and a drizzle of olive oil.
2. Kabocha Squash Salad
Toss warm roasted cubes into a mixed green salad with cranberries, goat cheese, and candied walnuts. The sweetness of the squash pairs beautifully with tangy and savory elements. A simple balsamic vinaigrette ties everything together.
3. Roasted Kabocha Pasta
Fold roasted kabocha pieces into cooked pasta with sage, brown butter, and a sprinkle of Parmesan. This Italian-inspired dish is rich, satisfying, and ready in under 15 minutes once your squash is roasted.
4. Kabocha Squash Tacos
Use roasted kabocha as a taco filling. Add black beans, avocado, pickled red onion, and a squeeze of lime. The natural sweetness of the squash balances the acidity of the toppings perfectly.
5. Kabocha Squash Bowls
Build a grain bowl with quinoa or brown rice, roasted kabocha, steamed greens, chickpeas, and a tahini dressing. This makes a complete, balanced meal that is great for lunch or dinner.
6. Roasted Kabocha Squash Hummus
Blend roasted kabocha into your favorite hummus recipe. The squash adds natural sweetness, creaminess, and a beautiful orange color. Serve with pita chips or fresh vegetables for dipping.
Common Mistakes to Avoid When Roasting Kabocha Squash
Even though roasting kabocha squash is straightforward, a few common mistakes can affect your results. Knowing what to avoid helps you get better outcomes every time.
Mistake 1: Overcrowding the Pan
This is the number one mistake people make. When you cram too many pieces onto one baking sheet, the squash steams instead of roasting. The result is soft, pale pieces without any caramelization. Give each cube enough room to breathe.
Mistake 2: Skipping the Oil
Some people try to roast squash without oil to cut calories. While this works in theory, oil plays a crucial role in browning and flavor development. A light coating makes a big difference in the final texture and taste.
Mistake 3: Cutting Pieces Too Different in Size
If some cubes are much bigger than others, they will cook at different rates. Smaller pieces burn while larger ones stay undercooked. Take your time and aim for uniform sizing.
Mistake 4: Not Preheating the Oven
Putting squash into a cold oven means it sits in a low-temperature zone for too long. This leads to uneven cooking and a mushy texture. Always preheat first.
Mistake 5: Forgetting to Flip
Without flipping, one side of each piece can over-brown while the other stays pale. A simple flip halfway through ensures even roasting on all sides.
Storing and Reheating Roasted Kabocha Squash
Leftover roasted kabocha squash stores beautifully. Let the squash cool completely before storing. Place it in an airtight container and refrigerate for up to 5 days. You can also freeze roasted kabocha for up to 3 months. Spread the cooled pieces on a baking sheet to freeze individually, then transfer them to a freezer bag.
To reheat, spread the squash on a baking sheet and warm it in a 350°F oven for about 10 minutes. This restores the crispy edges better than microwaving. The microwave works in a pinch, but it can make the squash a bit soft.
Nutritional Benefits of Kabocha Squash
Beyond its delicious flavor, kabocha squash nutrition is impressive. A one-cup serving of roasted kabocha provides a significant amount of vitamin A, which supports healthy vision and skin. It also delivers a good dose of vitamin C, which boosts immune function. The fiber content aids digestion and helps you feel full longer. Potassium in kabocha supports heart health and muscle function. With only about 40 calories per cup, it is a nutrient-dense food that fits into almost any eating plan.
The antioxidants found in kabocha, especially beta-carotene and lutein, help protect your cells from oxidative stress. Regular consumption of orange and green vegetables like kabocha has been linked to reduced inflammation and better long-term health outcomes. Adding roasted kabocha squash to your weekly meal rotation is one of the easiest ways to boost your nutrient intake without much effort.
Expert Insights on Perfecting Your Roast Kabocha Squash
Professional chefs and home cooking experts share a few insights that can elevate your roast kabocha squash from good to great. First, always make sure your squash is at room temperature before it goes in the oven. Cold squash from the fridge takes longer to roast and may cook unevenly. Second, do not be afraid of the heat. Higher temperatures like 425°F create better Maillard reaction, which is what gives roasted vegetables their deep, complex flavor and appealing golden-brown color.
Another expert tip is to season in layers. Toss the cubes with oil first, then salt, then any spices after roasting. This layered approach creates a more complex flavor profile. Some chefs also like to add a small drizzle of maple syrup or honey in the last 5 minutes of roasting. This amplifies the natural sweetness and creates a beautiful glaze on the edges.
Finally, let the squash rest for a few minutes after removing it from the oven. The residual heat continues to cook the pieces gently, and the texture becomes more consistent throughout. This small step makes a noticeable difference in the final result.
Conclusion
Roasting kabocha squash in the oven is one of the most rewarding and simple cooking techniques you can learn. From selecting the right squash at the store to pulling perfectly caramelized cubes out of the oven, the process is straightforward and forgiving. The results are always delicious, nutritious, and versatile enough to fit into countless recipes.
Now that you know the ideal temperature, timing, prep steps, and creative serving ideas, you are ready to make roast kabocha squash a regular part of your cooking routine. Start with the basic method, experiment with seasonings, and soon you will be adding this beautiful squash to soups, salads, pastas, and bowls with confidence. Your kitchen will smell incredible, and your taste buds will thank you.
Grab a kabocha squash on your next grocery run. Follow these steps, and enjoy the warm, caramelized goodness of perfectly roasted kabocha squash tonight.
Frequently Asked Questions
Do you peel kabocha squash before roasting it?
You do not have to peel kabocha squash before roasting. The skin softens during roasting and becomes edible. However, many people prefer to peel it first for a smoother texture. If you leave the skin on, cut the squash into smaller pieces so the skin cooks through completely.
What temperature should I roast kabocha squash at?
The best temperature to roast kabocha squash is between 400°F and 425°F. This range allows the edges to caramelize while the inside becomes tender and creamy. Higher temperatures produce better browning and deeper flavor.
How long does roasted kabocha squash last in the fridge?
Roasted kabocha squash keeps in an airtight container in the refrigerator for up to 5 days. Make sure it has cooled completely before storing. Reheat in a 350°F oven for about 10 minutes to restore the crispy edges.
Can you eat the skin of kabocha squash after roasting?
Yes, the skin of kabocha squash is edible after roasting. It softens significantly and adds extra fiber to your dish. Some people enjoy the texture, while others prefer to peel it off before or after cooking. It is entirely a personal preference.
How do you know when kabocha squash is done roasting?
The best way to check is to poke a piece with a fork. It should slide in easily with no resistance. The edges should be golden brown and slightly crispy. If the squash looks pale or the fork meets resistance, give it a few more minutes in the oven.
Can you roast kabocha squash seeds along with the flesh?
It is best to roast the seeds separately. Remove them from the squash before cutting and cooking. Rinse the seeds, pat them dry, toss with oil and salt, and bake at 300°F for about 20 to 25 minutes. Roasting seeds separately gives them a better crunch than roasting them alongside the flesh.