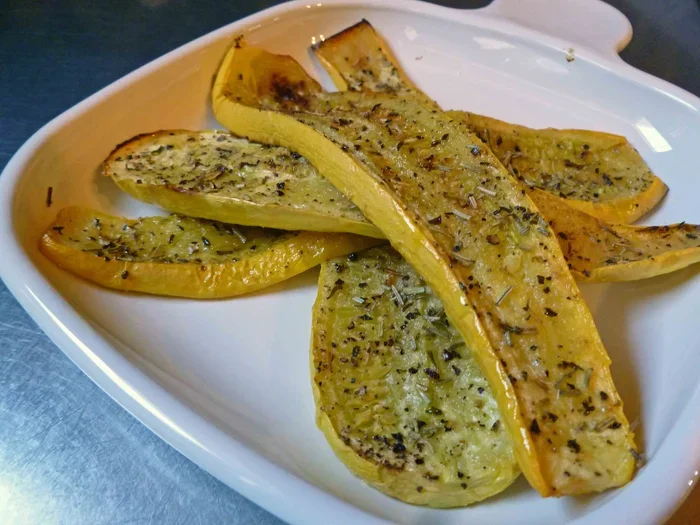
How To Roast Yellow Squash In The Oven The Right Way
Roasting yellow squash in the oven is one of the easiest and most delicious ways to enjoy this versatile summer vegetable. This guide walks you through every step, from picking the right squash at the store to pulling a perfectly golden, caramelized tray out of your oven. You will learn the ideal temperature, timing, seasoning blends, and pro tips that elevate your roast yellow squash in the oven game to a whole new level.
There is something deeply satisfying about pulling a tray of roast yellow squash in the oven out of the heat. The edges are golden and slightly crispy, the centers are tender and juicy, and the whole kitchen smells like a warm, savory hug. Whether you are a seasoned home cook or someone who barely knows their way around a cutting board, this method is incredibly simple to master.
Yellow squash is one of the most underrated vegetables in the kitchen. It is affordable, widely available, packed with nutrients, and incredibly versatile. You can grill it, sauté it, steam it, or — as this guide focuses on — roast it in the oven. And roasting brings out a natural sweetness and depth of flavor that other cooking methods simply cannot match. Once you learn how to do it right, you will never go back.
This guide covers everything you need to know about roast yellow squash in the oven. We will walk you through selecting the best squash, preparing it properly, choosing the right temperature and timing, and exploring seasoning options that take your dish from plain to phenomenal. By the end, you will have all the knowledge and confidence to make perfect roasted yellow squash every single time.
Key Takeaways
- Pick the Right Squash: Choose firm, bright yellow squash with smooth skin for the best roast yellow squash in the oven results.
- Cut Evenly for Uniform Cooking: Uniform slices ensure every piece cooks at the same rate and gets perfectly crispy edges.
- Use High Heat: A temperature of 400°F to 425°F creates beautiful caramelization without drying out the squash.
- Season Simply but Smartly: Olive oil, salt, pepper, and garlic go a long way. Add herbs like thyme or rosemary for extra flavor.
- Don’t Overcrowd the Pan: Spread slices in a single layer on a sheet pan to allow proper air circulation and even browning.
- Save the Seeds: Roasted yellow squash seeds make a crunchy, nutritious snack you can season any way you like.
- Versatile Side Dish: Roasted yellow squash pairs beautifully with chicken, fish, pasta, salads, and grain bowls.
📑 Table of Contents
- Why Roast Yellow Squash in the Oven?
- Selecting the Best Yellow Squash
- Tools and Ingredients You Will Need
- Step-by-Step Guide to Roast Yellow Squash in the Oven
- Seasoning Variations to Try
- Common Mistakes to Avoid
- Serving Suggestions and Pairings
- Storing and Reheating Leftovers
- Health Benefits of Roasted Yellow Squash
- Expert Tips for the Best Results
- Conclusion
Why Roast Yellow Squash in the Oven?
Oven roasting is hands down the best method for cooking yellow squash. It requires minimal effort, produces consistent results, and brings out flavors that other techniques simply cannot match. Let us break down why this method works so well.
Enhances Natural Sweetness
When you expose yellow squash to high heat, the natural sugars inside begin to caramelize. This creates a subtle sweetness and a slightly crispy exterior that is absolutely delicious. Boiling or steaming squash, by contrast, tends to make it mushy and bland. Roasting locks in flavor and adds a wonderful depth that makes even the simplest dish taste restaurant-quality.
Simple and Hands-Off
Unlike stovetop cooking, where you need to stand over the pan and flip things constantly, oven roasting is largely hands-off. You chop the squash, toss it with oil and seasoning, spread it on a sheet pan, and let the oven do the work. While the squash roasts, you can prepare the rest of your meal, set the table, or simply relax.
Healthy Cooking Method
Roasting uses little to no added fat. A light coating of olive oil is all you need. This makes roast yellow squash in the oven a fantastic option for anyone watching their calorie intake or looking to eat more vegetables. Yellow squash is low in calories and high in vitamins A and C, potassium, and fiber. It is genuinely one of the healthiest side dishes you can make.
Perfect for Meal Prep
Roasted yellow squash stores well in the refrigerator for up to five days. You can roast a big batch on Sunday and use it throughout the week in salads, wraps, pasta dishes, and bowls. This makes it an excellent choice for anyone who wants to eat healthy meals without spending hours in the kitchen every day.
Selecting the Best Yellow Squash
The foundation of great roasted squash starts at the store. Choosing the right squash makes a noticeable difference in taste, texture, and overall success. Here is what to look for.
Look for Bright, Even Color
A good yellow squash should have a vibrant, uniform yellow color. Avoid squash with dull skin, dark spots, or blemishes. These are signs of age or damage, and they can affect both flavor and texture. Bright, sunny yellow skin is a reliable indicator of freshness.
Check for Firmness
Gently squeeze the squash. It should feel firm and solid, not soft or spongy. A slightly tender squash is fine, but anything that gives too much pressure is past its prime. Firm squash holds its shape better during roasting and has a more satisfying bite.
Size Matters
Small to medium-sized yellow squash tend to be the best choice for roasting. They have thinner skin, fewer seeds, and a more delicate flavor. Large squash can be seedy and watery, which leads to soggy results. If you see oversized squash at the store, it is better to pass on them.
Yellow Squash vs. Zucchini
Yellow squash and zucchini are closely related, but they do have differences. Yellow squash tends to have a slightly sweeter flavor and a firmer texture. Zucchini is more neutral in taste and can become mushy more easily when roasted. Both work well in the oven, but yellow squash holds its shape better and offers a more distinctive flavor profile.
Tools and Ingredients You Will Need
One of the best things about roast yellow squash in the oven is how little you need. You do not require fancy equipment or hard-to-find ingredients. Here is a simple list to get you started.
Essential Tools
- A sharp chef’s knife: A good knife makes cutting squash quick, easy, and safe. Dull knives slip and can cause accidents.
- A cutting board: Use a stable, sturdy cutting board. A damp paper towel underneath prevents it from sliding.
- A rimmed sheet pan: This is the key to even roasting. Rimmed sheets prevent oil and juices from dripping into your oven.
- Parchment paper or a silicone baking mat: These prevent sticking and make cleanup a breeze.
- A large mixing bowl: For tossing the squash with oil and seasoning evenly.
Core Ingredients
- Fresh yellow squash: Two to three medium squash serve about four people.
- Olive oil: Extra virgin olive oil works best. It has a pleasant flavor and a good smoke point for roasting.
- Salt: Fine sea salt or kosher salt enhances the natural flavor of the squash.
- Black pepper: Freshly ground pepper adds a gentle heat that complements the squash beautifully.
Optional Flavor Boosters
While the core ingredients are all you need, a few extras can take your roasted squash to the next level. Minced garlic, dried herbs like thyme or rosemary, a squeeze of lemon juice, or a sprinkle of parmesan cheese all work wonderfully. Red pepper flakes add a subtle kick, and a drizzle of balsamic glaze after roasting creates a sweet and tangy finish.
Step-by-Step Guide to Roast Yellow Squash in the Oven
Now that you have your squash selected and your tools ready, it is time to get cooking. Follow these steps for perfectly roasted yellow squash every time.
Step 1: Preheat Your Oven
Start by preheating your oven to 425°F. This high temperature is the secret to achieving crispy, caramelized edges while keeping the inside tender. Preheating ensures the oven is fully hot when the squash goes in, which promotes even cooking from the very start. If you are using a convection oven, reduce the temperature slightly to 400°F to prevent over-browning.
Step 2: Wash and Dry the Squash
Rinse each squash under cool running water. Use your hands to gently scrub away any dirt or residue. Pat the squash completely dry with a clean towel. Moisture on the surface of the squash can create steam in the oven, which leads to soggy rather than crispy results. Take this step seriously — it makes a real difference.
Step 3: Trim and Slice
Trim off both ends of each squash. Then cut the squash in half lengthwise. Use a spoon to scoop out the seeds and the soft, stringy center. This part is edible but can be a bit watery, so removing it helps achieve a better texture.
Next, cut the squash into half-moon slices that are about a quarter-inch thick. Consistency is key here. If some slices are much thicker than others, they will cook at different rates. Aim for uniform pieces so everything roasts evenly.
Step 4: Season Generously
Place the sliced squash in a large mixing bowl. Drizzle with two to three tablespoons of olive oil per two pounds of squash. Add a teaspoon of salt and half a teaspoon of black pepper. Toss everything together with your hands until the slices are evenly coated.
This is also the time to add any optional seasonings. A teaspoon of garlic powder, a sprinkle of smoked paprika, or a few fresh thyme leaves all work beautifully. The goal is to coat every piece lightly but evenly. Do not be shy with the seasoning — squash has a mild flavor and benefits from a generous touch.
Step 5: Arrange on the Sheet Pan
Line your sheet pan with parchment paper or a silicone baking mat. Spread the seasoned squash slices in a single layer across the entire pan. This is the most important step for getting crispy results. If you crowd the squash pieces on top of each other, they will steam instead of roast, and you will end up with soft, pale squash instead of golden, caramelized pieces.
If you have a lot of squash, use two sheet pans rather than overcrowding one. The extra space allows hot air to circulate freely around each piece, ensuring even browning and a satisfying texture.
Step 6: Roast and Monitor
Place the sheet pan on the middle rack of your preheated oven. Roast for 20 to 25 minutes. At the 12-minute mark, open the oven and use tongs or a spatula to flip each slice. This ensures both sides get equally golden and crispy.
Keep an eye on the squash during the last few minutes of cooking. Ovens vary, and you want to pull the tray out when the edges are deeply golden brown but the centers are still tender. Over-roasting can cause the squash to become dry and shriveled, while under-roasting leaves it pale and soggy.
Step 7: Serve Immediately
Once the squash is done, remove the tray from the oven and let it cool for two to three minutes. The squash will continue to firm up slightly as it rests. Serve it warm as a side dish, toss it into a salad, or add it to your favorite main course. Freshly roasted squash is at its absolute best right out of the oven.
Seasoning Variations to Try
One of the joys of roast yellow squash in the oven is how easy it is to customize the flavor. Here are some delicious variations to experiment with.
Italian Style
Toss your squash with olive oil, minced garlic, dried oregano, dried basil, and a pinch of red pepper flakes. After roasting, sprinkle with freshly grated parmesan cheese and a squeeze of lemon juice. This combination pairs beautifully with pasta and chicken.
Mediterranean Style
Use olive oil, cumin, smoked paprika, and a pinch of cinnamon. After roasting, drizzle with tahini and a squeeze of fresh lemon. Top with chopped fresh parsley and toasted pine nuts for a vibrant, flavor-packed side dish.
Ranch Style
Toss the squash with olive oil, garlic powder, onion powder, and dried dill. After roasting, sprinkle with a mix of ranch seasoning and a little extra parmesan. This style is a crowd-pleaser at potlucks and family dinners.
Sweet and Savory
For a unique twist, drizzle the roasted squash with a tiny bit of honey or maple syrup after cooking. Sprinkle with sea salt and fresh cracked black pepper. The sweet-savory combination creates an addictive flavor that people will keep coming back for.
Common Mistakes to Avoid
Even a simple recipe like roasted yellow squash has a few pitfalls. Avoiding these common mistakes will help you achieve better results every time you cook.
Skipping the Preheat
Putting squash into a cold oven means it cooks unevenly and takes longer. Always preheat your oven fully before the squash goes in. This ensures a hot environment that starts the caramelization process immediately.
Overcrowding the Pan
This is the single most common mistake people make when roasting vegetables. When squash slices are piled on top of each other, they trap steam and steam instead of roast. The result is soft, pale, and soggy squash. Give each piece plenty of space and use a second pan if needed.
Using Too Much Oil
A little oil helps conduct heat and promotes browning, but too much makes the squash greasy and prevents it from crisping up. Two to three tablespoons for two pounds of squash is the sweet spot. Toss well and make sure the oil is distributed evenly rather than pooling at the bottom of the bowl.
Ignoring the Flip
Flipping the squash halfway through cooking is essential for even browning. If you do not flip, one side will be beautifully golden while the other stays pale and soft. Set a timer for the halfway point so you do not forget.
Leaving the Seeds In
While the seeds are edible, they can make the squash feel mushy and watery when roasted. Scooping them out before cutting the squash into slices gives you a cleaner, better texture. Save the seeds, rinse them off, and roast them separately for a crunchy snack.
Serving Suggestions and Pairings
Roasted yellow squash is incredibly versatile and pairs well with a wide variety of dishes. Here are some ideas for incorporating it into your meals.
As a Side Dish
Roasted yellow squash is a natural companion to roasted chicken, grilled steak, baked salmon, or pan-seared pork chops. Serve it alongside rice, quinoa, or roasted potatoes for a complete and balanced plate.
In Salads
Add warm roasted squash to a bed of mixed greens, cherry tomatoes, cucumber, and feta cheese. Drizzle with a simple lemon vinaigrette for a light, refreshing lunch that is packed with flavor.
In Pasta Dishes
Toss roasted squash with penne, a garlic and olive oil sauce, and fresh basil for a quick and satisfying weeknight dinner. The sweetness of the roasted squash complements the richness of the pasta beautifully.
In Grain Bowls
Build a nourishing grain bowl with quinoa, roasted yellow squash, chickpeas, avocado, and a tahini dressing. This makes for a hearty, healthy meal that is perfect for lunch or dinner.
Storing and Reheating Leftovers
If you have leftover roasted yellow squash — and let us be honest, it is rare that there are any — store it properly to maintain its quality. Let the squash cool completely before transferring it to an airtight container. Refrigerate for up to five days.
To reheat, spread the squash on a sheet pan and warm it in the oven at 350°F for about 8 to 10 minutes. This helps restore the crispy edges that are the hallmark of great roasted squash. Avoid microwaving, as it tends to make the squash soggy and limp.
You can also freeze roasted yellow squash for up to three months. Spread the cooled squash on a baking sheet, freeze it until solid, then transfer it to a freezer bag. When ready to eat, reheat in the oven at 375°F until warmed through. The texture will not be exactly the same as fresh, but it still tastes wonderful.
Health Benefits of Roasted Yellow Squash
Beyond its delicious taste, yellow squash offers a range of health benefits that make it a smart addition to your diet.
Yellow squash is low in calories and high in water content, making it an excellent choice for weight management. It is rich in vitamin A, which supports eye health and immune function. The vitamin C found in squash acts as a powerful antioxidant, helping to protect your cells from damage. Potassium in yellow squash supports heart health and helps regulate blood pressure. The fiber content aids digestion and promotes a feeling of fullness after meals.
Because roasting uses minimal added fat, roast yellow squash in the oven is one of the healthiest ways to prepare this vegetable. It preserves most of its nutrients while enhancing its natural flavor. It is a win-win for your taste buds and your well-being.
Expert Tips for the Best Results
Here are some pro tips from experienced cooks that will help you perfect your roasted yellow squash technique.
- Use a wire rack: Placing a wire rack on top of your sheet pan allows air to circulate underneath the squash, resulting in even crispier results on both sides.
- Room temperature squash roasts better: Let the squash sit at room temperature for 15 to 20 minutes before roasting. Cold squash straight from the refrigerator takes longer to cook and may result in uneven roasting.
- Add a pinch of sugar: If your squash is not very sweet, a tiny pinch of brown sugar or honey mixed into the oil before tossing can enhance the natural caramelization.
- Fresh herbs are best: If using fresh thyme or rosemary, add them in the last five minutes of roasting so they do not burn. Dried herbs can go on at the beginning.
- Taste and adjust: After roasting, taste a piece and adjust the seasoning. A little extra salt, a squeeze of lemon, or a dash of hot sauce can take the dish from good to outstanding.
Conclusion
Roast yellow squash in the oven is one of the simplest, healthiest, and most delicious things you can do in the kitchen. It requires just a few ingredients, minimal effort, and about half an hour of your time. The result is a golden, flavorful, and satisfying side dish that pairs with almost any meal.
By following the steps outlined in this guide, you will avoid the common mistakes that lead to soggy, bland squash. You will learn how to select the best squash, cut it evenly, season it well, and roast it at the right temperature for perfectly crispy edges and tender centers. The seasoning variations give you the freedom to get creative and tailor the dish to your personal taste.
Whether you are cooking for yourself, your family, or a dinner party, roasted yellow squash is a reliable and impressive choice. It is a vegetable that truly shines when treated with a little care and attention. So preheat your oven, grab a squash from your kitchen, and get ready to enjoy one of the easiest and most rewarding dishes you will ever make.
Frequently Asked Questions
Can I roast yellow squash with the skin on?
Yes, you absolutely can. The skin of yellow squash is thin and edible, and it adds a nice texture when roasted. Just make sure to wash the squash thoroughly before cooking. The skin will soften during roasting and become tender rather than tough.
What is the best temperature to roast yellow squash?
The ideal temperature for roasting yellow squash is 425°F. This high heat promotes caramelization and creates crispy edges while keeping the inside tender. If you prefer a slightly softer result, you can lower the temperature to 400°F and extend the cooking time by a few minutes.
How long does it take to roast yellow squash in the oven?
Most yellow squash roasts in 20 to 25 minutes at 425°F. The exact time depends on the thickness of your slices and the size of the squash. Thicker slices may need an extra 5 minutes, while very thin slices could be done in as little as 15 minutes. Flip the slices halfway through for even cooking.
Can I roast yellow squash and zucchini together?
Absolutely. Yellow squash and zucchini make a great combination. They have similar cooking times and pair well together. Just be aware that zucchini tends to release more moisture, so you may want to cut it slightly thicker than the squash to prevent it from getting too soft.
How do I store leftover roasted yellow squash?
Let the squash cool completely, then transfer it to an airtight container and refrigerate. It will keep for up to five days. Reheat in the oven at 350°F for 8 to 10 minutes to restore the crispy texture. Avoid microwaving, as it can make the squash soggy.
Can I freeze roasted yellow squash?
Yes, you can freeze roasted yellow squash for up to three months. Let it cool completely, spread it on a baking sheet to freeze individually, then transfer it to a freezer-safe bag. Reheat in the oven at 375°F until warmed through. The texture will be slightly softer than fresh, but the flavor remains good.