How To Install Wall Oven Microwave Combination at Home
Installing a wall oven microwave combination can transform your kitchen with sleek, space-saving convenience. This guide walks you through every step, from choosing the right unit and preparing your space to wiring, mounting, and testing. You will learn essential safety tips, common mistakes to avoid, and expert advice that makes the process manageable for most homeowners.
Key Takeaways
- Choose the right unit: Match your combination microwave oven to your kitchen layout, cabinet space, and electrical setup.
- Prepare properly: Review the installation manual, gather tools, and confirm electrical and venting requirements before you start.
- Safety comes first: Always turn off the power supply and follow local building codes to prevent hazards.
- Mounting and wiring matter: A secure mounting bracket and proper electrical connection ensure long-term performance and safety.
- Test thoroughly: Run through all functions after installation to confirm everything works correctly before daily use.
- Avoid common mistakes: Skipping the trim kit, ignoring ventilation, and neglecting circuit capacity are top errors to dodge.
- Call a pro when needed: Complex electrical or gas connections are best handled by a licensed technician.
📑 Table of Contents
- How To Install Wall Oven Microwave Combination at Home
- Understanding Your Wall Oven Microwave Combo
- Gathering Tools and Preparing Your Space
- Electrical Wiring and Safety Requirements
- Mounting the Unit and Installing the Trim Kit
- Testing and Final Setup
- Common Mistakes to Avoid During Installation
- When to Call a Professional
- Maintenance Tips After Installation
- Conclusion
How To Install Wall Oven Microwave Combination at Home
A wall oven microwave combination is one of the smartest upgrades you can make in any kitchen. Instead of juggling a separate countertop microwave and a standalone wall oven, this single unit handles both jobs with ease. It saves counter space, looks sleek, and makes cooking more convenient every single day.
Many homeowners assume installation is a job for a professional. And sometimes it is. But with the right preparation and a steady hand, a lot of people can handle this project themselves. This guide breaks down every step in plain, simple language. You will learn how to pick the right unit, prepare your space, handle wiring, mount the appliance, and test everything before you cook your first meal.
Whether you are replacing an old unit or installing a combination microwave oven for the very first time, this article has you covered. Let us dive in and get your new kitchen appliance up and running.
Understanding Your Wall Oven Microwave Combo
Before you touch a single tool, it helps to understand what you are working with. A built-in microwave oven combo unit is not the same as a countertop model. It is designed to sit inside a cabinet or wall cavity, which means the installation process is a bit different.
Most combination units include a microwave function and a conventional oven or convection oven function. Some models also offer a grill or steam feature. The unit typically comes with a trim kit that frames the opening and gives it a built-in look.
Types of Wall Oven Microwave Combinations
There are a few common configurations to know about before you buy.
- Over-the-range combos: These sit above your cooktop and often include a ventilation hood. They double as a range hood, which is a big plus for small kitchens.
- Single-wall combos: These are installed at eye level in a tall cabinet. They do not vent smoke or steam from a cooktop but offer a clean, streamlined look.
- Double combos: These pair a full-size wall oven with a microwave drawer or a smaller microwave oven above. They are perfect for busy households that cook often.
Each type has different microwave dimensions and clearance requirements. Always check the product specifications before you begin. Measuring your available space accurately will save you a lot of headaches later.
Key Features to Look For
When shopping for a wall oven microwave combination, keep an eye on these features:
- Wattage and capacity of both the microwave and oven
- Ventilation options, including external ducting or recirculating filters
- Child lock and safety lock features
- Preprogrammed cooking settings and sensor cooking
- Energy efficiency ratings
- Ease of cleaning, such as self-clean or steam-clean cycles
Gathering Tools and Preparing Your Space
Proper preparation is the secret to a smooth installation. Rushing into this without the right tools or a clear plan is one of the most common mistakes homeowners make.
Tools You Will Need
Before you start, gather these items:
- Screwdriver set (Phillips and flathead)
- Power drill with drill bits
- Level
- Tape measure
- Stud finder
- Wire stripper and electrical tape
- Safety glasses and work gloves
- The installation manual that came with your unit
Checking Your Electrical Setup
Every kitchen appliance installation starts with the electrical side. A wall oven microwave combo requires a dedicated circuit, which means it should not share an outlet with other appliances. Most units need a 240-volt circuit for the oven function and a separate 120-volt line for the microwave, though some models use a single circuit.
Here is what to check:
- Locate your home’s electrical panel and identify an available dedicated circuit.
- Confirm the voltage and amperage match your unit’s requirements.
- Make sure the power outlet is properly grounded.
- If no suitable circuit exists, plan to have an electrician install one before you begin.
Never attempt to run a high-wattage appliance on a shared circuit. Overloading can trip breakers, damage the unit, or even cause a fire. This is one area where cutting corners is simply not worth the risk.
Measuring and Marking the Cutout
Your cabinet or wall opening needs to match the microwave dimensions specified in the manual. Use your tape measure and a stud finder to locate the framing behind the drywall or cabinet.
Mark the cutout lines carefully. Double-check every measurement before you cut anything. A hole that is too large or too small will cause serious fitting problems later.
Quick Tip: Always refer to the manufacturer’s cutout diagram. Every brand has slightly different requirements, and the installation manual is your best friend here.
Electrical Wiring and Safety Requirements
Wiring is the most technical part of installing a wall oven microwave combination. It is also the part where safety matters the most. Take your time with this step and do not rush.
Understanding the Wiring Process
The wiring process depends on your specific model and your home’s existing electrical setup. In most cases, you will need to connect the unit to both a power source and a grounding system.
Here is a simplified overview of what the process typically looks like:
- Turn off the power at the circuit breaker. Use a voltage tester to confirm the power is off.
- Run the appropriate gauge wire from the electrical panel to the installation location.
- Install a properly rated dedicated circuit breaker if one does not already exist.
- Connect the wires from the unit to the household wiring, matching black to black, white to white, and green or bare to the ground wire.
- Secure all connections with wire nuts and wrap with electrical tape.
- Mount the unit and restore power.
If any of these steps feel unfamiliar, please call a licensed electrician. Working with high-voltage electricity is not something to guess at.
Common Electrical Mistakes to Avoid
- Using the wrong wire gauge, which can cause overheating
- Forgetting to install a dedicated circuit breaker
- Skipping the grounding connection
- Not using a thermal protection device
- Connecting wires without turning off the power first
Mounting the Unit and Installing the Trim Kit
Once the electrical work is done, it is time to mount the unit. This is where the microwave mounting bracket comes into play. Most combination units include a bracket system that attaches to the cabinet frame or wall studs.
Step-by-Step Mounting Process
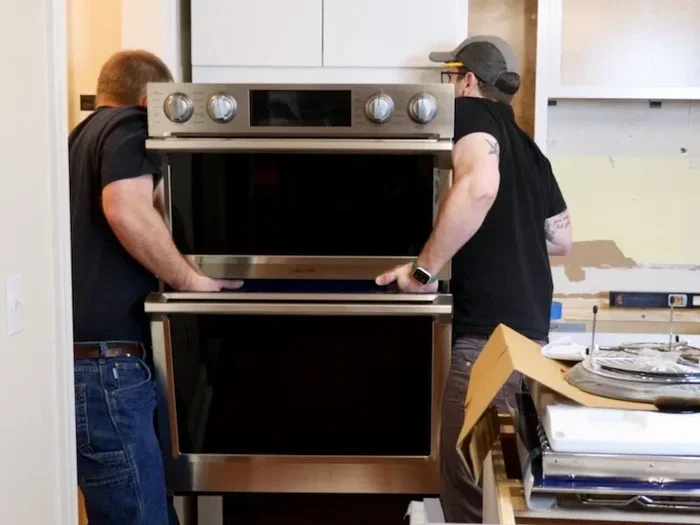
- Have a helper hold the unit in position while you check for level.
- Use the mounting bracket to secure the unit to the cabinet or wall frame.
- Attach the bracket to the wall studs using the appropriate screws. Drywall alone will not support the weight of a full unit.
- Slide the unit onto the bracket and confirm it sits flush and secure.
- Install the trim kit around the opening to create a finished, built-in look.
The trim kit is an important part of the process that many people skip or install incorrectly. It not only improves the appearance but also helps with ventilation and heat dissipation. Make sure the trim fits snugly and is properly secured.
Venting and Airflow Considerations
If your combo unit includes a ventilation function, proper airflow is essential. Most over-the-range models vent cooking fumes either through a duct to the outside or through a recirculating filter system.
- External venting: This is the most effective method. It requires a ventilation duct routed through the wall or cabinet to an exterior vent. It removes smoke, steam, and odors more efficiently.
- Recirculating venting: This method uses charcoal filters to clean the air before pushing it back into the kitchen. It is easier to install but less effective at removing grease and smoke.
Make sure the ventilation hood or duct is clear of obstructions. A blocked vent will reduce performance and can cause heat to build up inside the cabinet.
Expert Insight: “Always use the ventilation duct size recommended by the manufacturer. A duct that is too narrow will restrict airflow and reduce the effectiveness of your combination microwave oven ventilation system,” says a certified kitchen appliance installer.
Testing and Final Setup
With the unit mounted and wired, you are almost done. But before you start cooking, you need to test everything thoroughly.
Testing the Microwave Function
Turn on the microwave and test it with a simple task, like heating a cup of water. Check for even heating and listen for any unusual sounds. The turntable should rotate smoothly, and the interior light should turn on when the door opens.
Testing the Oven Function
Set the oven to a low temperature, around 300 degrees Fahrenheit, and let it run for a few minutes. Verify that the heating elements activate properly and that the temperature gauge reads accurately.
Checking the Ventilation
Run the ventilation function and confirm that air moves through the duct or filter system as expected. If you smell any burning plastic or notice unusual odors, turn the unit off immediately and recheck your wiring connections.
Final Safety Checks
Before you close up the cabinet and walk away, complete these final checks:
- Confirm all screws and brackets are tight
- Verify the unit is level and stable
- Check that no wires are pinched or exposed
- Make sure the power outlet is accessible for future maintenance
- Review the thermal protection settings and confirm they are active
Quick Tip: Keep the installation manual and your purchase receipt in a safe place. You will need both for warranty claims and future troubleshooting.
Common Mistakes to Avoid During Installation
Even experienced DIYers can make mistakes when installing a wall oven microwave combination. Here are the most common errors and how to avoid them.
Skipping the Manufacturer’s Instructions
Every unit is different. The manufacturer’s manual contains specific requirements for clearance, wiring, and mounting that are unique to your model. Skipping this step can void your warranty and create safety hazards.
Ignoring Local Building Codes
Many areas have specific building codes that govern kitchen appliance installation. These codes may dictate electrical requirements, ventilation standards, and clearance distances. Check with your local building authority before you start.
Using the Wrong Circuit
Plugging a high-wattage combination unit into a standard household outlet is a recipe for disaster. Always use the dedicated circuit specified by the manufacturer.
Forgetting About Clearance
Wall oven microwave combos need proper clearance on all sides for heat dissipation. Insufficient clearance can cause overheating, reduced performance, and even fire risk. Measure carefully and follow the manufacturer’s clearance guidelines exactly.
Not Asking for Help
These units are heavy and awkward to handle alone. Always have a helper during the mounting process. Trying to hold a heavy combination unit in place by yourself is both dangerous and frustrating.
When to Call a Professional
There is no shame in calling a professional for your microwave installation. In fact, it is often the smartest choice. You should strongly consider hiring a licensed technician if:
- Your home does not have the required electrical setup
- You need to run new wiring or install a new circuit
- The installation involves gas connections
- You are uncomfortable working with electrical systems
- The unit requires complex ductwork or structural modifications
A professional installer will complete the job safely and correctly. Many manufacturers also require professional installation to keep the warranty valid. Check your warranty terms before you decide to go the DIY route.
Maintenance Tips After Installation
Once your wall oven microwave combination is installed and working, a little regular maintenance goes a long way. Here are a few simple habits that keep your unit running well for years:
- Clean the interior with a mild solution after spills
- Replace charcoal filters every six to twelve months for recirculating models
- Wipe down the exterior and control panel regularly
- Check the ventilation duct for grease buildup annually
- Inspect the door seal for wear and tear
- Run a self-clean cycle if your model has that feature
Taking care of your appliance extends its lifespan and keeps it performing at its best. A little maintenance now saves you from costly repairs later.
Conclusion
Installing a wall oven microwave combination is a rewarding project that adds both function and style to your kitchen. From choosing the right unit and preparing your space to handling wiring, mounting, and testing, every step matters. Take your time, follow the manufacturer’s instructions closely, and never hesitate to call a professional when the job feels beyond your comfort level.
The result is a sleek, efficient cooking setup that makes meal preparation faster and more enjoyable. With the right combination microwave oven in place, you will wonder how you ever cooked without one. Start your project today and enjoy the difference a well-installed combo unit makes in your daily cooking routine.
Frequently Asked Questions
Can I install a wall oven microwave combination by myself?
Yes, many homeowners successfully install a wall oven microwave combination on their own, especially if they have basic electrical knowledge and the right tools. However, if you are unsure about wiring or electrical connections, it is always best to hire a licensed professional to ensure safety and compliance with local codes.
What electrical requirements does a wall oven microwave combo need?
Most combination microwave oven units require a dedicated circuit, typically 240 volts for the oven function and 120 volts for the microwave. Always check the specific installation manual for your model to confirm the exact voltage, amperage, and circuit requirements before you begin.
Do I need a trim kit for my wall oven microwave installation?
Yes, a trim kit is essential for a proper and safe installation. It frames the opening, supports the unit, aids in ventilation, and gives your kitchen a clean, built-in appearance. Most combination units come with a trim kit included in the box.
How long does it take to install a wall oven microwave combination?
A typical DIY installation takes between three and six hours, depending on your experience level and the complexity of the setup. Factors like running new wiring, installing ductwork, or modifying cabinetry can extend the timeline. Planning ahead and having all tools ready helps keep the process on track.
What is the difference between external venting and recirculating venting?
External venting routes cooking fumes and grease through a duct to the outside, which is more effective at removing smoke and odors. Recirculating venting uses charcoal filters to clean the air before pushing it back into the kitchen. External venting is the preferred method for best performance and cleaner air.
Can I mount a wall oven microwave combination in any cabinet?
Not every cabinet is suitable. The cabinet must be strong enough to support the unit’s weight, have the correct cutout dimensions, and include proper thermal protection and ventilation clearance. Always consult the manufacturer’s specifications and your local building codes before selecting a cabinet location for your built-in microwave oven combo.
=== SEO Title ===
How To Install Wall Oven Microwave Combination at Home
=== META TITLE ===
Install Wall Oven Microwave Combo at Home (Easy Guide)
=== URL SLUG ===
/install-wall-oven-microwave-combination
=== OPENING SUMMARY ===
A wall oven microwave combination is a smart, space-saving upgrade that brings both a microwave and a full oven into one sleek unit. This guide shows you exactly how to install wall oven microwave combination setups safely and confidently at home. You will learn about electrical requirements, mounting steps, venting options, and common mistakes to avoid along the way. Whether you are a seasoned DIYer or a beginner, these clear instructions make the process manageable for anyone. By the end, you will feel ready to tackle the project and enjoy a more efficient kitchen.
=== INTRODUCTION ===
A wall oven microwave combination is one of the most practical upgrades you can make in any kitchen. Instead of cluttering your counters with separate appliances, this single unit combines a microwave and an oven into one compact design. It frees up space, improves your kitchen’s look, and makes everyday cooking faster and easier.
If you have been thinking about upgrading your kitchen setup, now is a great time to learn how to install wall oven microwave combination units yourself. This guide walks you through the entire process in simple, friendly language. You do not need to be an electrician or a professional installer to get the job done right. With the right preparation and a little patience, you can enjoy your new combo appliance in just one afternoon.